 Gina Vega presents a clinical case which addressed the patients’ overcrowding and shade concerns through a combination of Invisalign clear aligner treatment and tooth whitening.
Patient details and concerns
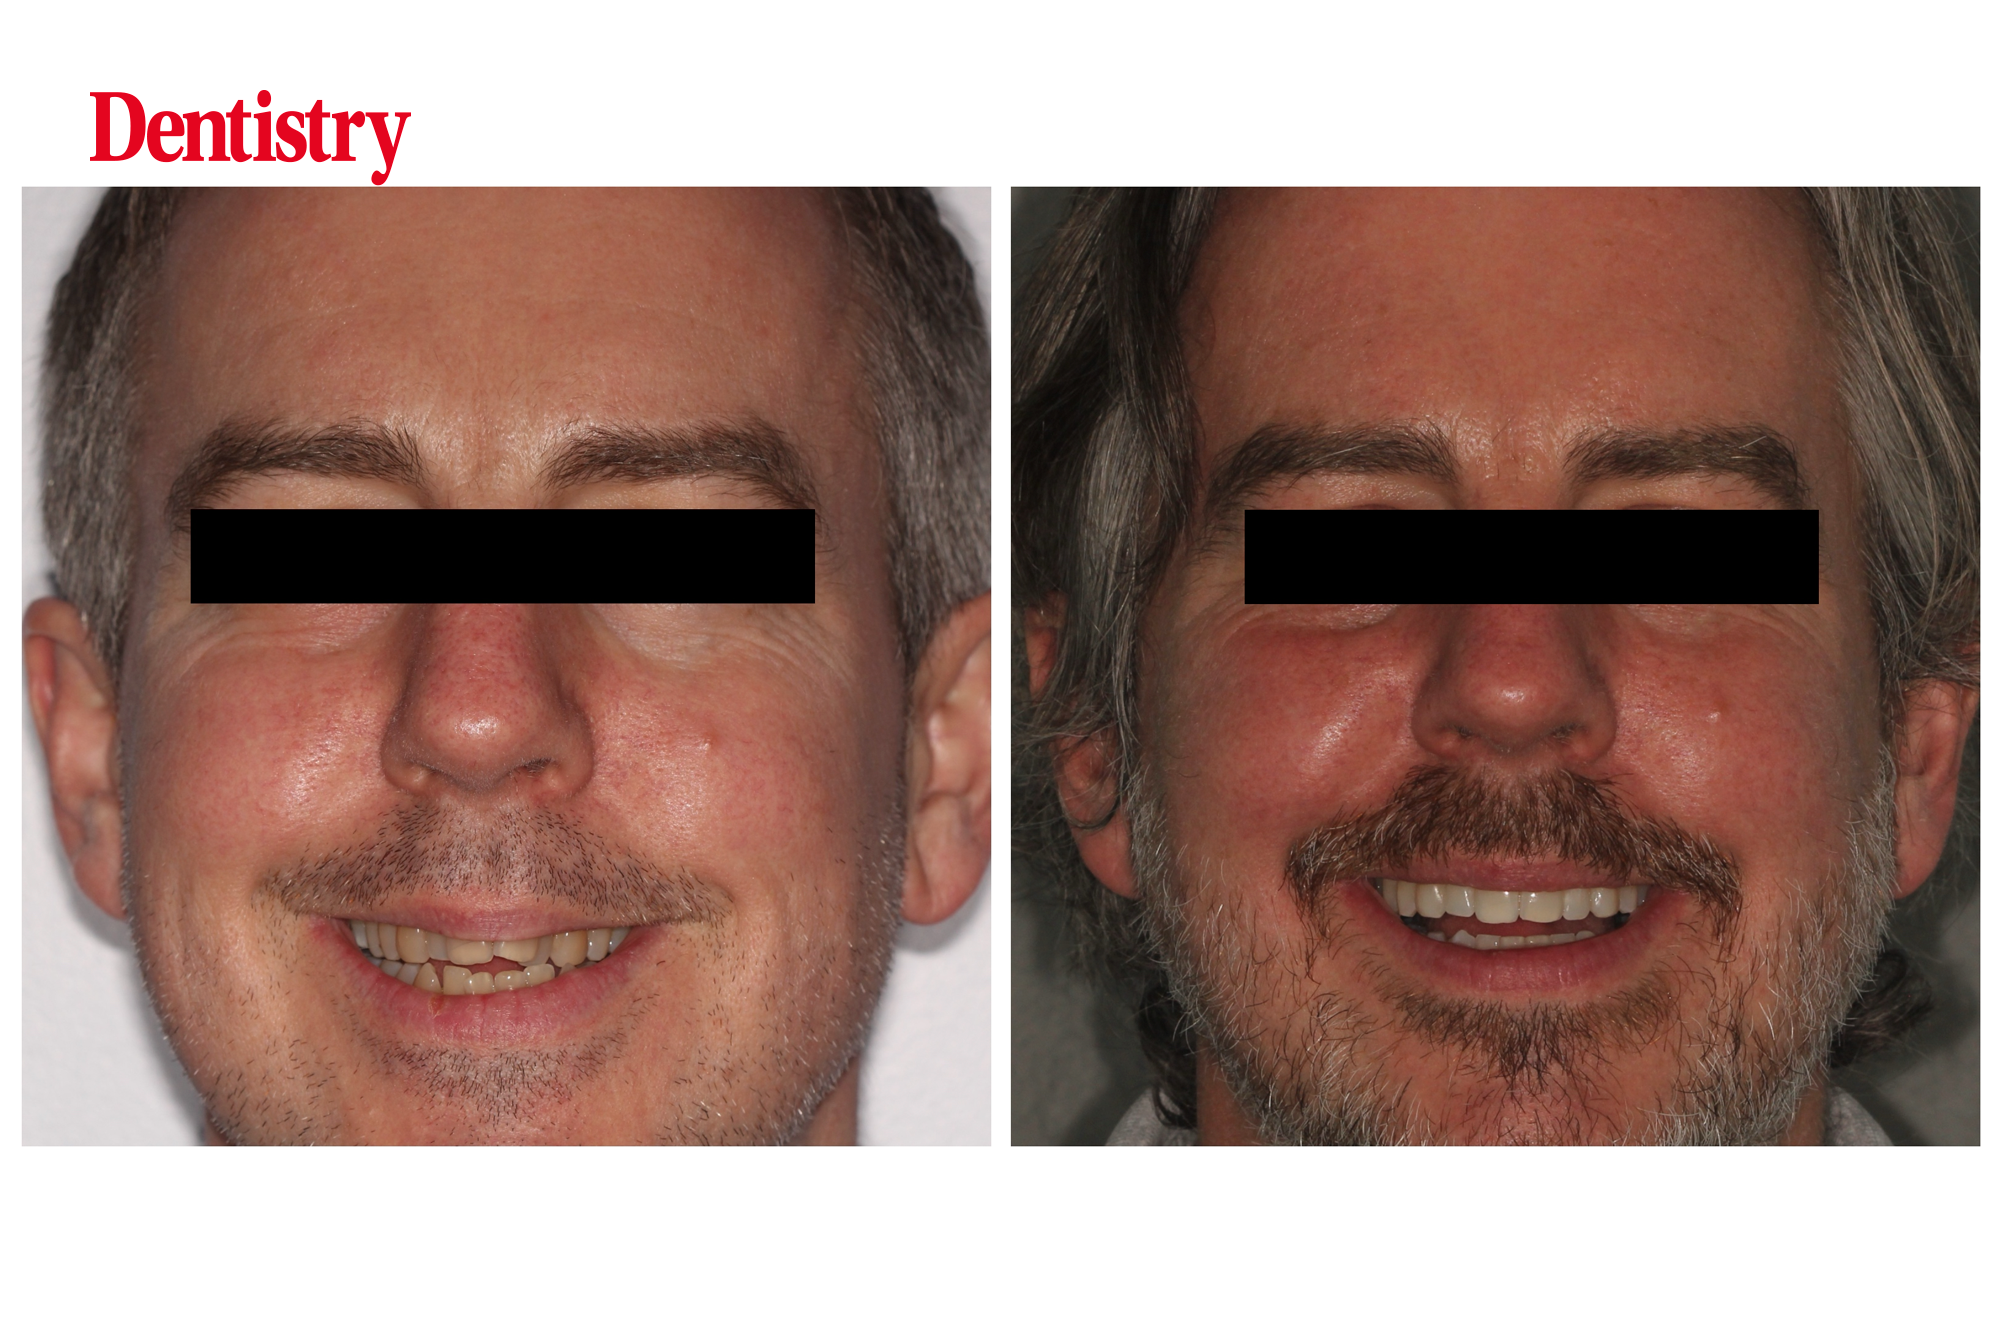
A 42-year-old gentleman originally from Scotland had been working in London for the last eight years as a risk assessment consultant.
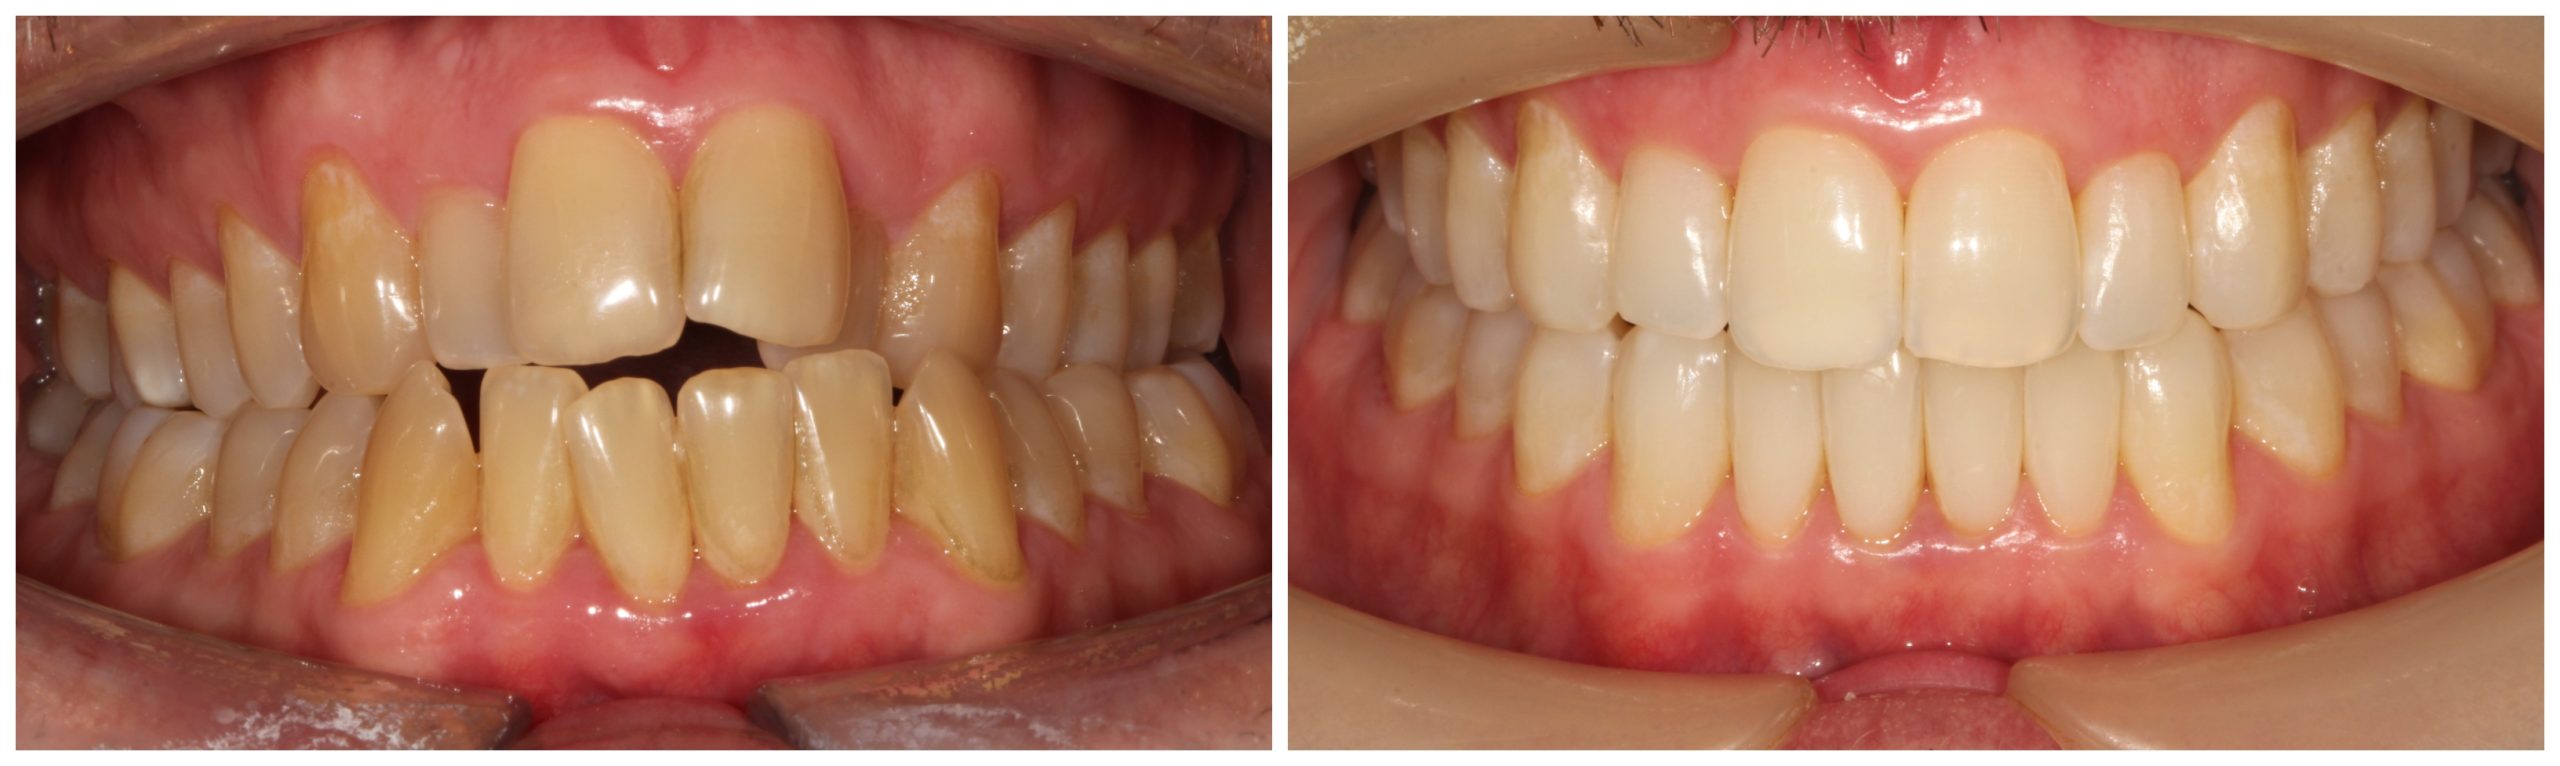
Grading his teeth a four out of 10, the patient had always been very self-conscious. He felt unattractive with damaged self-esteem. He hid his teeth when smiling for photos and avoided social events with new people.
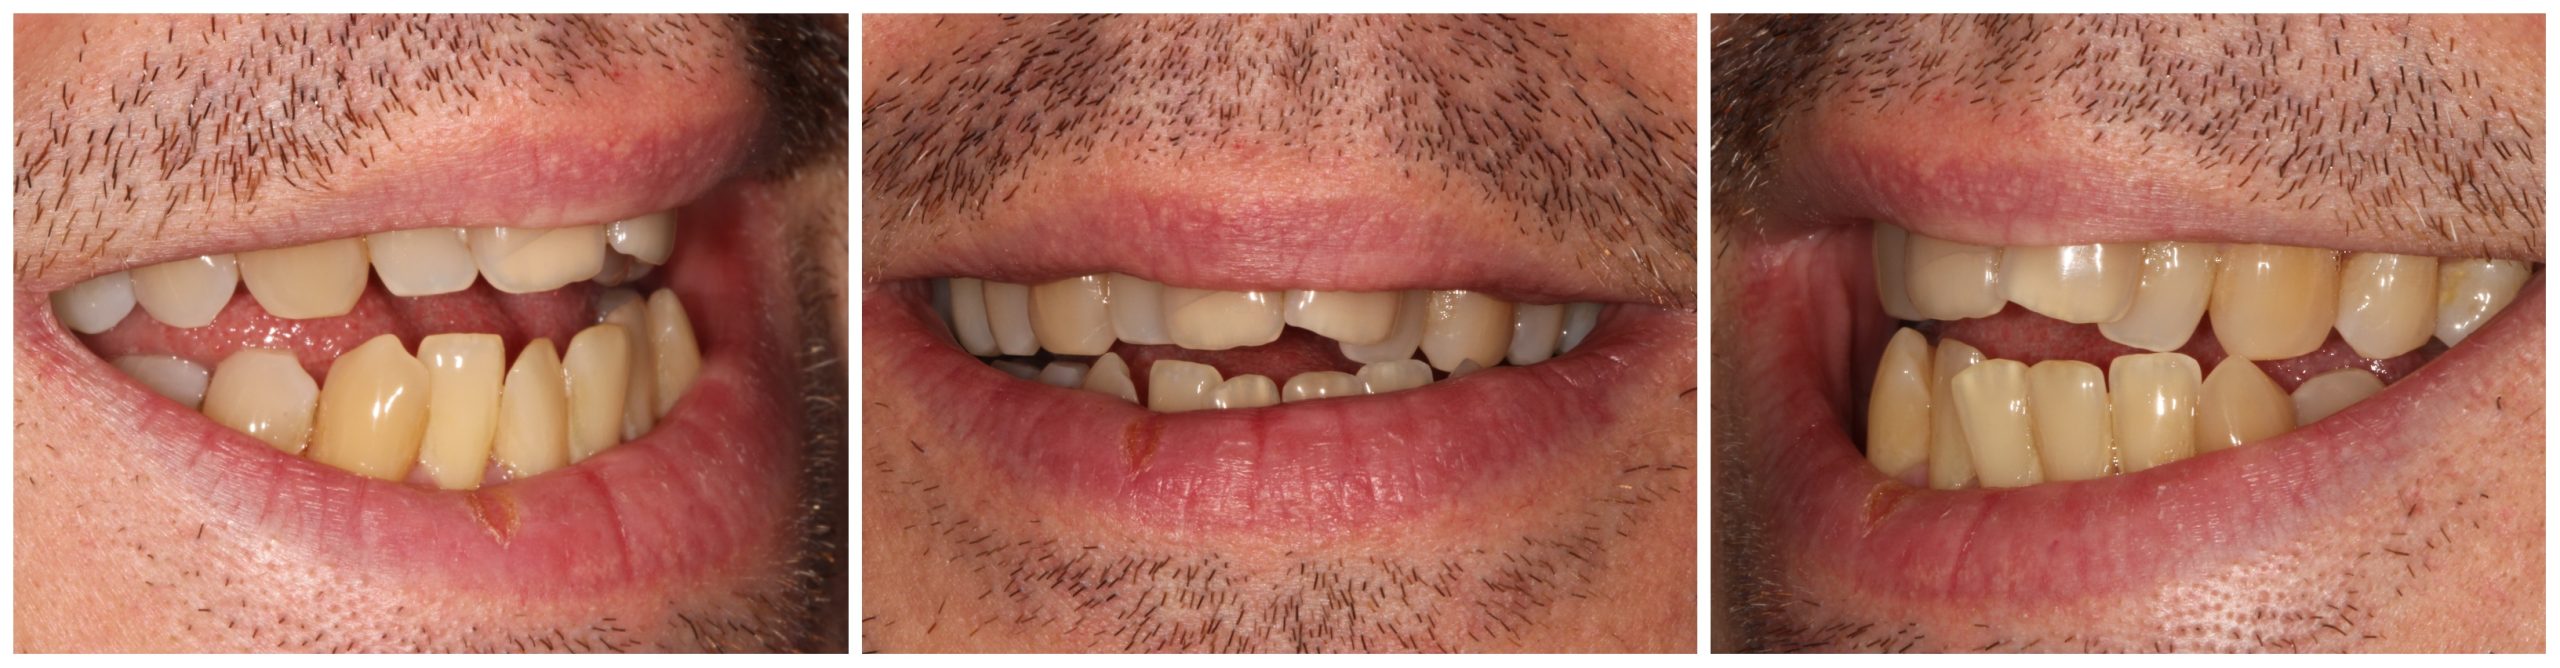
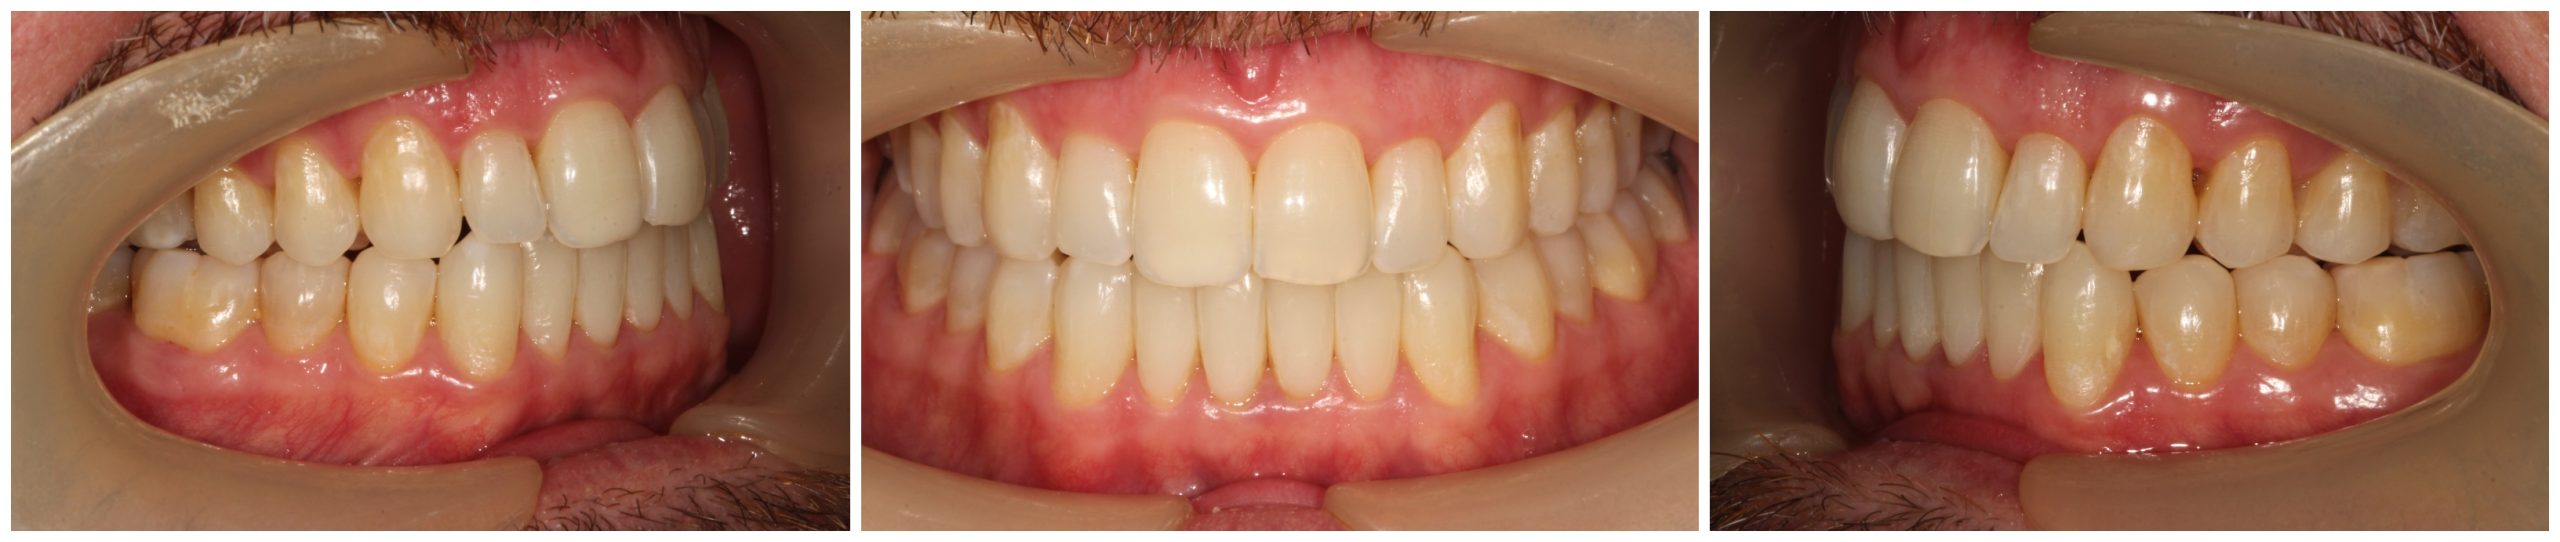
His main concern was the overall crowding, especially in his two front teeth, which were so forward that it seemed that he did not have any teeth on the back.
His teeth were very dark and he wanted to make them whiter.
The patient had localised mild periodontitis and generalised gingivitis. Dental treatment was needed before any aesthetic treatment could commence. This should include visits to the hygienist to treat periodontal disease and advice on oral hygiene.
Treatment alternatives
The following options were discussed:
- No treatment, accepting current situation
- Orthodontic treatment with Invisalign with extractions of L8s
- Orthodontic treatment with Invisalign with no extractions with extensive interproximal reduction (IPR)
- Specialist orthodontic referral that could treat with fixed braces, lingual braces, or clear aligners with possible advice of extractions of L4s or L8s
- Tooth whitening after orthodontic treatment.
The patient was not looking into having a fixed brace as he thought this would make him even more conscious about his smile and uncomfortable at work.
After thinking about his options, the patient gave consent for Invisalign with no extractions and tooth whitening.
Record taking
- Clinical photos
- iTero scan
- Orthopantomography (OPG).
Radiographic report
The Panoramic radiograph showed permanent adult dentition with multiple restorations present.
There was mild generalised bone loss of around 10% on molar areas. Root morphology was within normal limits.
Clinical
The patient presented with a skeletal class III, high FMPA with no asymmetries and increased lower face height. His lips were competent and average. The intra oral exam revealed a class III right and left canine and molar class I.
The patient’s overjet was 3mm and his overbite was decreased presenting an anterior open bite. His upper and lower midline were centred with lower slant to the right.
Moderate crowding was present in the upper and lower regions, with arch size discrepancy. A narrow upper arch presented with an irregular narrow buccal corridor and protruding U1s, and wider lower arch.
Problem list:
- Irregular, narrow buccal corridor
- Incisor class II division 1
- Crowding upper and lower arches
- Left cross-bite
- Right border to border bite.
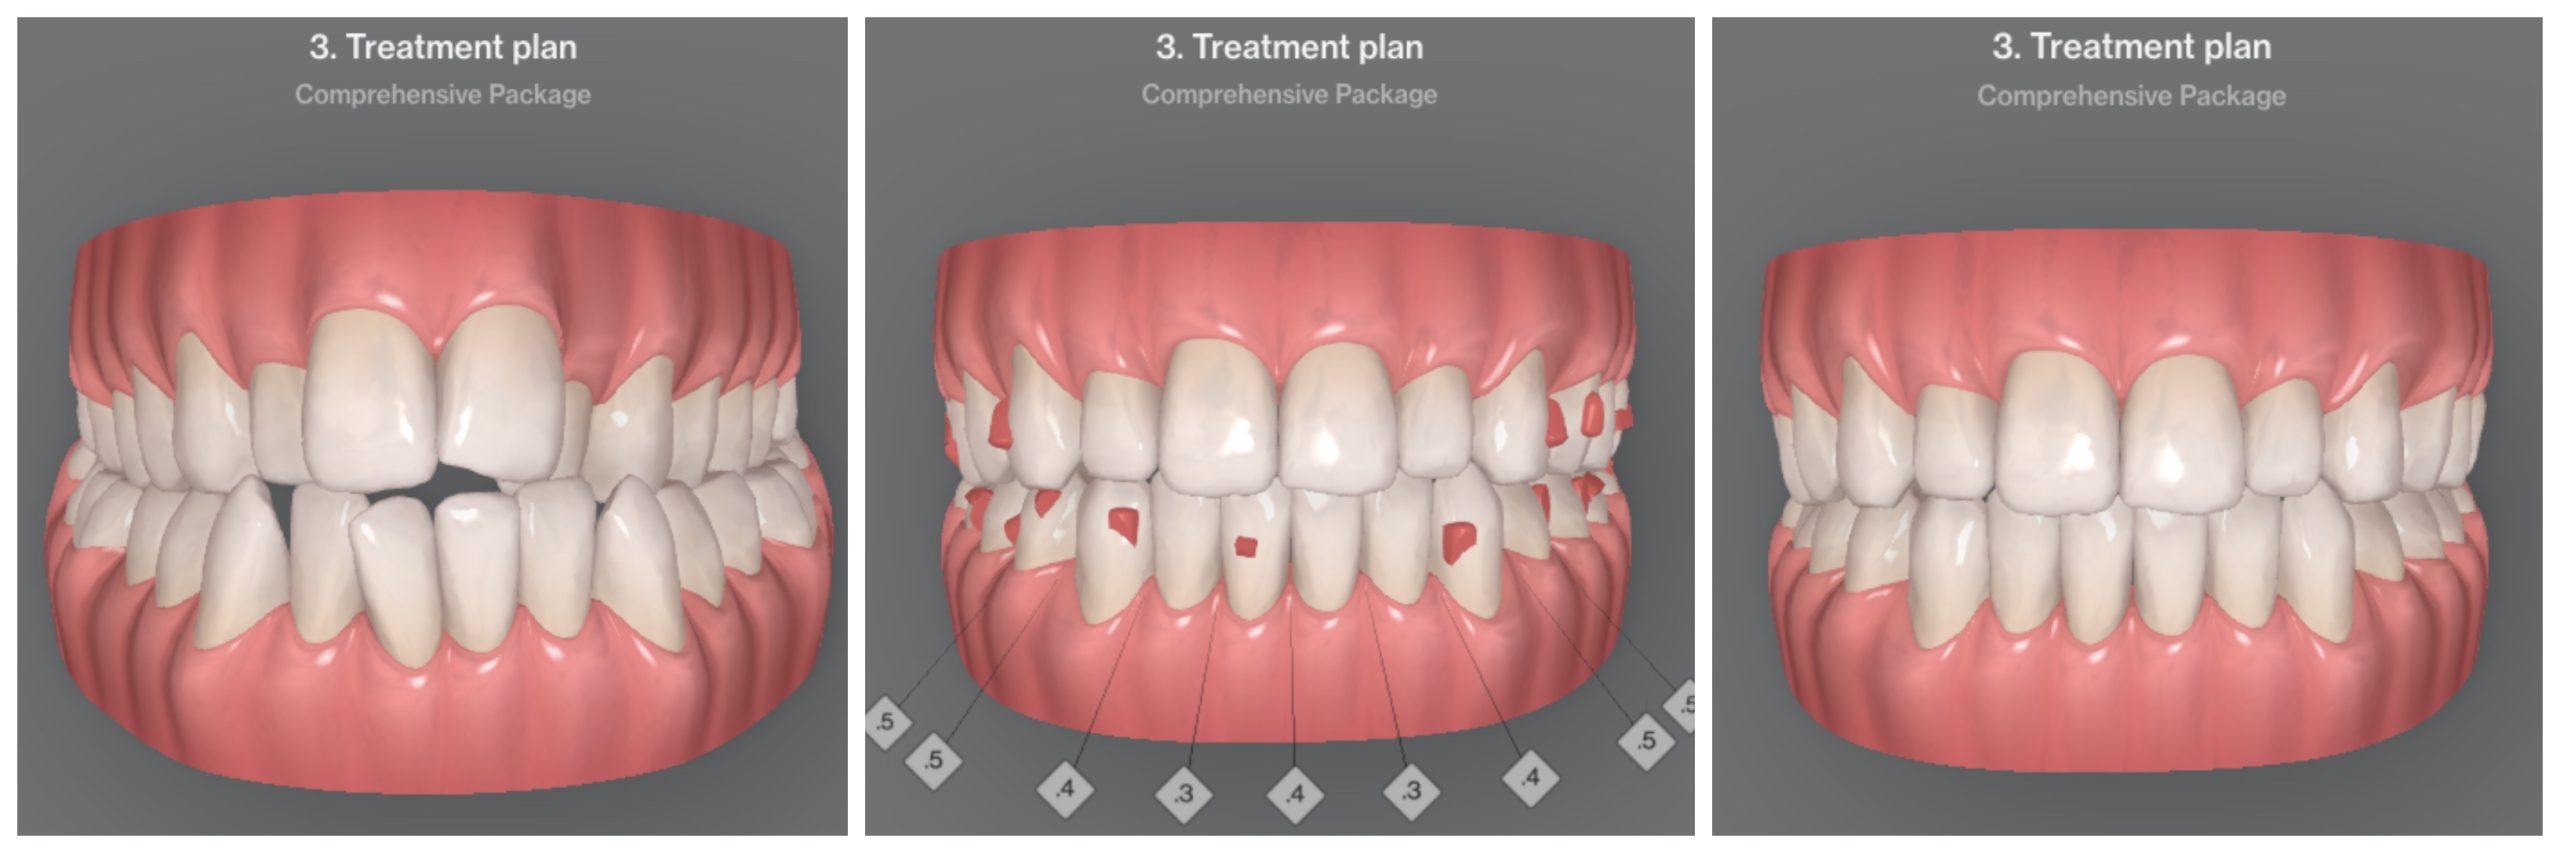
Treatment plan
Invisalign Comprehensive with the following treatment objectives:
- Expand buccal corridor
- Incisal class III to class I
- Resolve crowding upper and lower arches
- Resolve general misalignment
- Increase overbite.
A treatment plan including extractions of L8s was discussed with the patient at the first consultation, but the patient declined this option.
Protocols and case planning
Prescription to Invisalign
- Please expand the upper arch to a parabolic arch, compressing distal in on 7s
- When expanding apply G8 protocols
- Buccal and palatal cusps to be levelled with the occlusal plane on upper and lower molars
- Occlusal plane to be symmetrical on the right and left side
- Place horizontal gingival bevelled attachments 4mm palatally on upper anterior incisors
- Upper 6s passive horizontal gingival bevelled attachments 5mm
- Lower 6s passive horizontal occlusal bevelled attachments 5mm
- Anterior segment on lower arch – start with crown torque to resolve crowding with intrusion and proclination (round tripping) once the contact points are in the right place add 0.2mm IPR between all incisors going from mesial LR3 to mesial LL3
- Finish intrusion with retrusion and add some lingual root torque, all in one movement
- Align teeth incisally.
Applying the prescription
Once I received the first Clincheck I use the 3D controls to apply my protocols. I always plan the upper arch first to have a symmetrical parabolic shape. When expanding I make sure that G8 protocols are applied. This is the addition of buccal root torque on molars to prevent as much as possible the crown tipping buccally, but instead to have actual bodily movement of the molars.
In this case the arch needed to be expanded several millimeters, mainly to correct the border-to-border bite on the right and the cross bite on the left. It was also paramount to give back symmetry to the buccal corridor and to create the space needed for U1s to be retruded.
I used U8s as anchors to control the many millimeters of expansion and retrusion I planned for the anterior segment.
I placed passive attachments on the 6s to aid anchorage and conventional rectangular attachments palatally on upper incisors to help the movement of the teeth.
Once the upper arch was planned, I planned the lower arch, starting in this case with compression of the arch to help resolve the cross-bite.
To resolve the lower crowding IPR was added in posterior and anterior segments.
When intruding the anterior segment, I ask for retrusion and lingual root torque to be applied at the same time. This helps bodily movements into the bone and prevents gum recession.
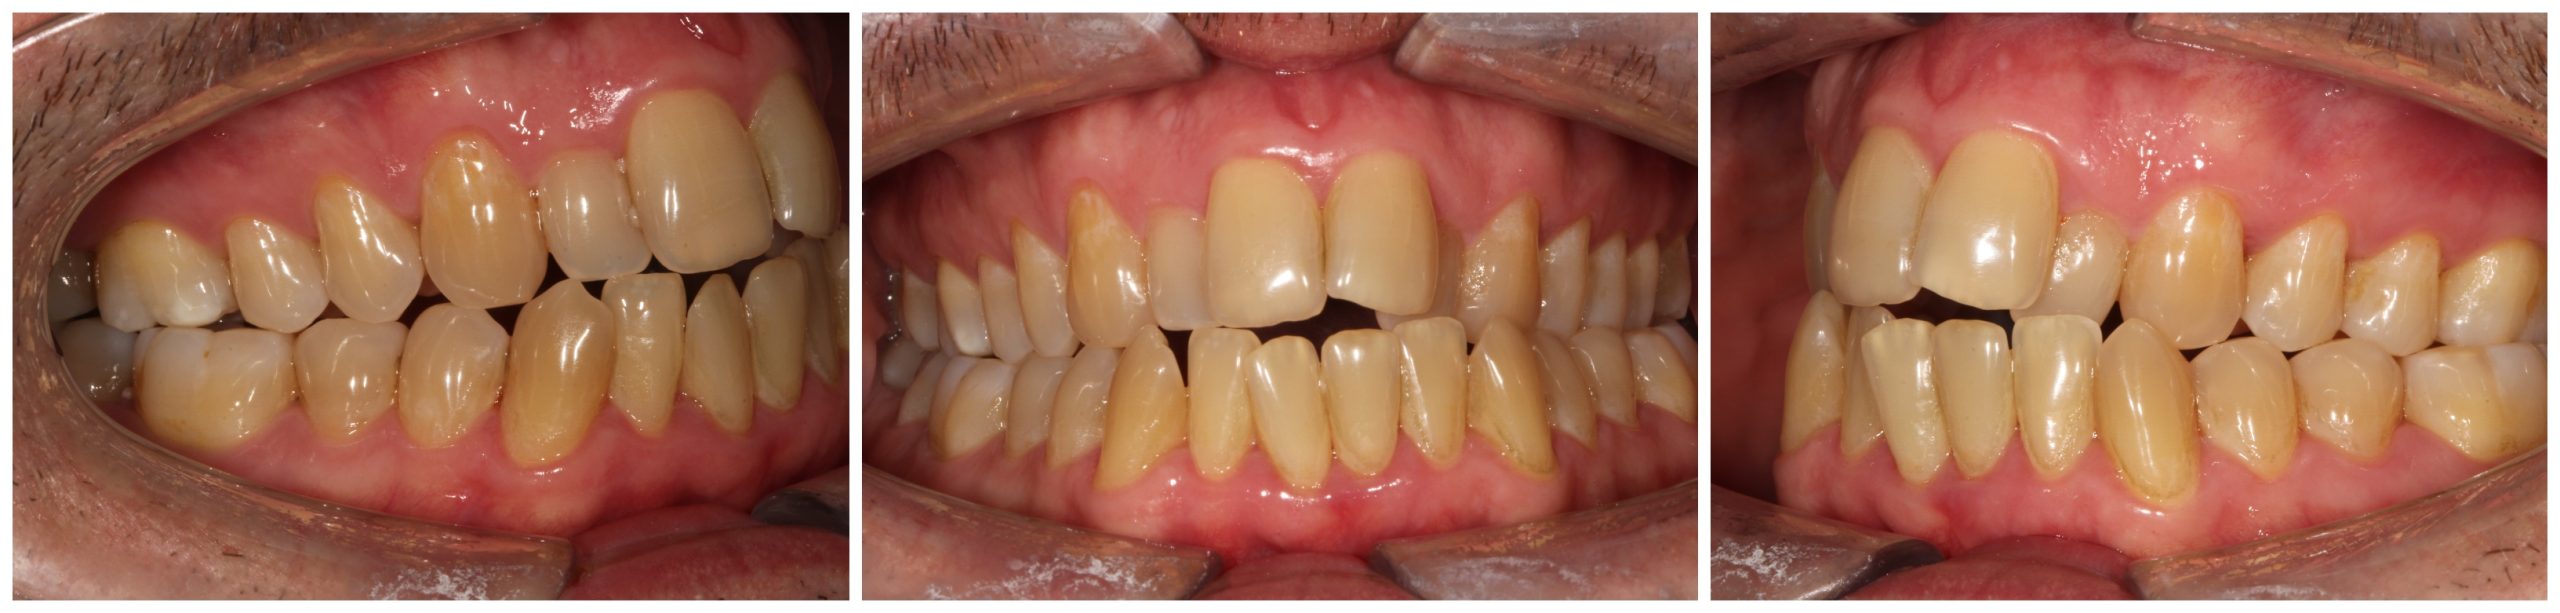
After a series of modifications the Clincheck was approved with 27 upper and lower active aligners.
Attachments:
- Optimised multiplane attachments UR7 and LL7
- Optimised rotation attachments upper and lower 3s, LR5, UL4, LL4 and LL5
- Optimised root control attachment LR4
- Optimised extrusion attachment LR1
- Optimised retention attachment UR5
- Horizontal gingival beveled attachments 5mm U6s
- Horizontal gingival beveled attachments 4mm on palatal surface of U1s and U2s
- Horizontal occlusal beveled attachments L6s.
The patient was review every six to eight weeks.
Additional Aligners
After aligner 27 it was noted that upper arch needed further expansion and alignment. The occlusion also needed corrections. All attachments were removed before photos and a new iTero scan were taken.
After a series of modifications, a new Clincheck was approved with 14 upper and lower active aligners and an extra 2.3mm of IPR between the lower anterior segment.
- Optimised multiplane attachments on right 6s and UL6
- Optimised root control attachments on UR5 and UL3
- Optimised rotation attachment LR4, LR3 and LL3
- Optimised retention attachments UR4, UL4 and LL5
- Horizontal gingival beveled attachments 5mm U6s and UL5
- Horizontal gingival beveled attachments 4mm on palatal surface of U1s and U2s
- Horizontal occlusal beveled attachments L6s.
A further six upper and lower active aligners were needed to close residual spaces and settle the bite.

Retention protocol
At this point we discussed the chipped U1s and discussed edge bonding. The patient was not interested in having his teeth re-shaped as he liked that they still look like his teeth.
Vivera retainers were fitted to be used 20-22 hours a day for eight weeks. After this the patient was to use them only at night. The patient was made aware of the necessity for indefinite retention to minimise both relapse and maturational changes.
The patient is very pleased with the results and decided to put the cherry on the cake with tooth whitening. We used Enlighten Smiles tooth whitening.
If you would like to gain confidence to treat this type of treatments, you need to learn the basics well. My Diamond Masterclass has the objective to discuss in a friendly and simple manner every single aspect of Invisalign including:
- Consultation
- Records and Orthodontic Assessment
- Biomechanics
- Clincheck modifications and 3D controls
- Attachments
- IPR.
Our next Diamond Masterclass is on 2 March 2024.
For more information visit www.alignertraining.com.

