Elaine Mo describes restoring a carious molar with durable composite resin, overcoming the challenge of naturally deep fissures.
Direct composite restorations can be one of the most adaptable, minimally invasive ways to restore decayed, fractured and worn teeth.
In the following case, two carious molars were restored with composite resin. The treatment focused on creating primary anatomy to avoid duplication of the deep fissures consistent with the natural teeth.
Contouring the composite to obtain the desired anatomy minimised the risk of future food traps, returned the teeth back to health and provided an aesthetic result.
Patient presentation and diagnosis
A 30-year-old female with good general dental health and no existing complaints attended Square Mile Dental Centre for a routine examination. She was a new patient of mine.
A bitewing radiograph was taken as part of her initial examination to assess general bone level health and to aid caries diagnosis. The X-ray software allowed the contrast to be changed, which can assist with the detection of decay.
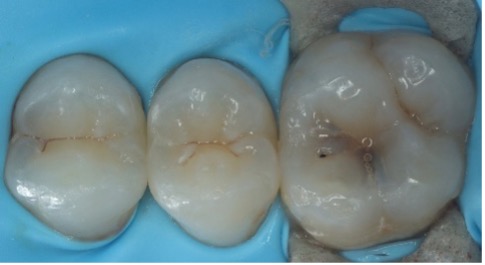
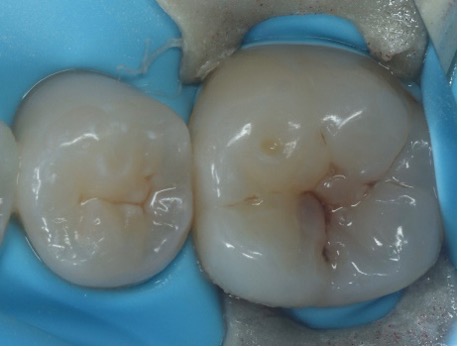
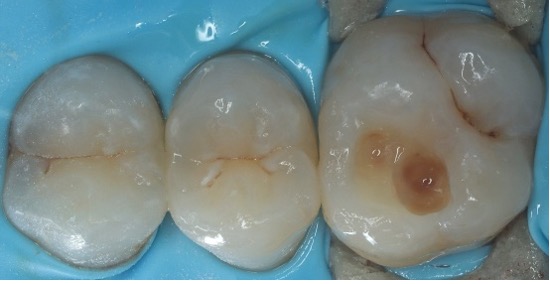
Occlusal caries was noted on the UL6 and LL6 (Figures 1 and 2) with shadowing visible when the teeth were wet and dry, suggesting caries in the dentine level (Kidd and Fejerskov, 2016).
The caries had formed within the deep natural fissures of the teeth and spread.

The patient was not experiencing any symptoms, although it had been a while since her last full dental examination.
She consented to have the caries treated and opted to restore the teeth using composite resin. The UL6 was treated first.
Isolation and caries removal
Local anaesthetic was administered to the patient by buccal infiltration and rubber dam was placed to isolate the UL6.
Even if a single occlusal restoration is planned, I tend to isolate multiple teeth with the rubber dam. This allows greater access and visibility of the adjacent teeth, which gives me a better idea of height and aesthetics for the restoration.
Also, if the decay does extend further than expected then access is already available for the use of matrix bands and rings without having to replace the rubber dam.
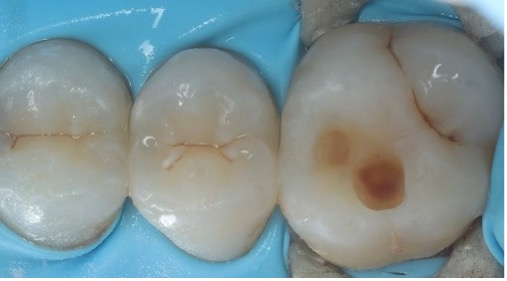
The caries was removed using an electric motor handpiece and fine red banded burs (Figure 3). The enamel-dentine junction (EDJ) and periphery were cleared of all decay and stained tissue.
In accordance with the International Caries Consensus Collaboration (ICCC) guidelines, the harder stained dentine remained at the deepest part of the cavity towards the pulp to prevent loss of tooth vitality (Banerjee et al, 2017).
Bonding protocol
The enamel was bevelled using inverted cone fine diamond burs to maximise the enamel surface area to enhance bond strength, maintain compressive forces and improve marginal integration.
A dental air abrasion unit with 29µ aluminium oxide air abrasion powder removed biofilm prior to bonding. Isopropyl alcohol was used to clean any remaining powder remnants from the cavity.
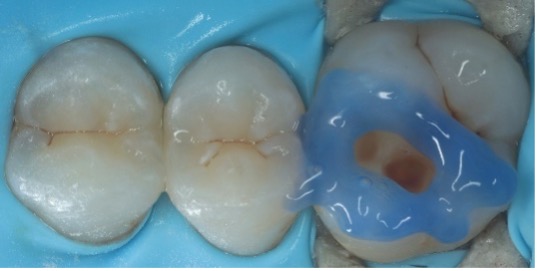
Following a self-etch dentine bonding protocol, selective bonding of the enamel was carried out using a viscous etch of 35% ultra-etch phosphoric acid for 30 seconds (Figure 5). The etch gel was rinsed for 30 seconds, then air dried with the three-in-one tip and high-speed suction.
I find this method more predictable because etching of the dentine is not required, therefore the area can then be dried without the need to worry about the desiccation of dentine (Van Meerbeek et al, 2011).
The primer was generously applied for 30 seconds, before being dried. The bond is then also applied liberally and continuously agitated for 30 seconds.
After drying for 10 seconds, and when the bond stopped visibly moving, the tooth was light-cured in accordance with the manufacturer’s instructions.
I prefer to use a multi-LED curing light for 20 seconds to allow activation over a broader wavelength spectrum, which is important for modern day composites containing newer photoinitiators.
Following bonding, a small amount of Kulzer Venus Diamond Flow was applied and light-cured. The material lines the cavity base and seals the dentine floor (Figure 6). The resin coat also helps to reduce surface tension prior to the next layer of composite.
Durable composite restoration
The UL6 was built up in light-cured increments using Kulzer Venus Diamond A2 shade (Figure 7). The material was packed using an ultrasonic composite instrument to reduce any voids between layers and allow for better manipulation of the material. I enjoy the easy handling of Venus Diamond, as it is not sticky and does not slump.
I have been using the material for several years and, after assessing long-term reviews of the cases, I have found it to be fracture resistant and durable, especially in larger restorations.


At Square Mile Dental, we routinely see Venus Diamond cases that are functioning well more than 10 years after placement. The composite also matures well and adapts perfectly to the colour of the surrounding dentition.
The restoration was built up mainly with primary anatomy. This was to avoid creating deep fissures that can cause the patient to feel like food has become stuck. This was the area where the caries initially formed.
Instead, we can aesthetically create the illusion of depth by adding a small amount of stain. This is especially beneficial if, as in this case, the patient presented with naturally stained fissures.
Final touches and polishing
Kulzer Venus Color choco and amber shades were mixed together and applied to create mild fissure staining. It is important to use just a very small quantity and place precisely. I use a size 12 blade tip to apply the stain and remove the excess with a microbrush.
After curing the application of the shades, a final light-cure was carried out through glycerine gel to remove the sticky oxygen inhibition layer, which can attract stains, causing discolouration.
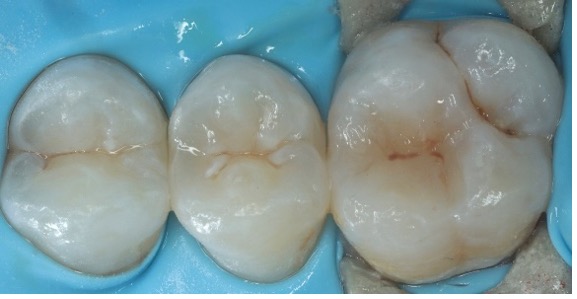
Rubber dam was removed, and minimal polishing was completed using brown and green mini polishing points (Figure 8) at a low-speed on the electric handpiece with water. This process polishes the composite surface. A polishing brush on a slow speed was used for a final lustre.
The occlusion was checked with 21µ Accufilm articulating paper in all lateral and dynamic movements (Figure 9).
No adjustments were required. The same restorative and polishing protocols were used to restore the LL6 (Figure 10).
Natural-looking result
A successful functional and aesthetic outcome was achieved. The caries had originally developed in the patient’s natural deep fissures and had spread. In this case, I believe that by keeping the restoration simple, creating only primary anatomy and avoiding replication of the original fissure patterns and pits, food traps can be prevented.
When treating posterior cases, in my experience, the patient is less concerned about aesthetics. Here, the priority for me is to restore comfort and function.
The application of a little stain can create the illusion of depth and allows the restoration to blend aesthetically with the rest of the dentition.
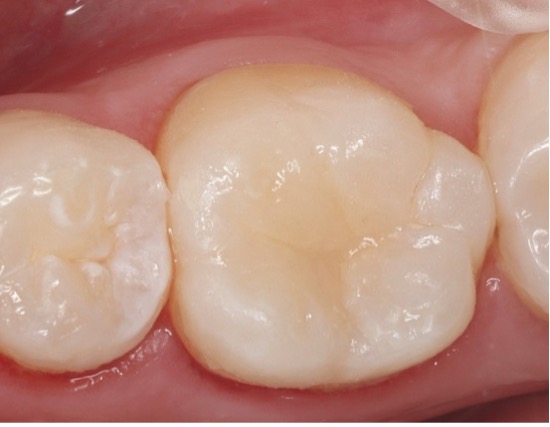
The patient was very happy with the natural-looking result and reported that all was satisfactory at the two-month review (Figure 11)
References
- Kidd E, Fejerskov O (2016) Essentials of dental caries. Oxford University Press
- Banerjee A, Frencken JE, Schwendicke F, Innes NPT (2017) Contemporary operative caries management: consensus recommendations on minimally invasive caries removal. Br Dent J 223(3): 215-222
- Van Meerbeek B, Yoshihara K, Yoshida Y, Mine A, De Munck J, Van Landuyt KL (2011) State of the art of self-etch adhesives. Dent Mater (1): 17-28.

