
The Aligner Dental Academy (ADA) offer its top tips for completing your Invisalign cases to leave your patients with a smooth and rewarding conclusion to their treatment.
So, you have successfully guided your patient through their Invisalign treatment, and both you and your patient are thrilled with the results.
- Case selection –✓ Done
- Records taken – ✓ Done
- ClinCheck reviewed and consented – ✓ Done
- IPR and attachments placement – ✓ Done
- Monitored and reviewed case – ✓ Done
- Final aligner review – what do I do?
The teeth are aligned, the smile is transformed, but the journey isn’t over just yet.
The finishing phase is crucial to ensure long-term success and patient satisfaction.
And to help you navigate this final stage seamlessly, the ADA offers a few expert tips to achieve that flawless finish your patients deserve.
1. Are you really finished?
Overall, if the patient has been compliant with the treatment plan, they should have reached their treatment goals. However, if there are parts of the plan that have not been quite achieved, you and your patient may decide to go for fine tuning, or as Invisalign like to call it, Additional Aligners.
The process to submit for Additional Aligners is very straightforward; a new scan/impression is needed, plus new photos.
Once you have those, you can submit for the Additional Aligners via your Invisalign Drs Site.
Top tips – be specific in your prescription about what specific teeth or areas need improving. The ClinCheck you will receive will always aim to get the patient back to your original treatment goals so make sure you outline what teeth/ movements are needed to get to that so the technician is fully guided.
2. Final checks
Now the teeth are fully aligned, you and your patient are happy with the position with the teeth and you are both keen to get those blasted attachments finally off.
But before removing attachments, ensure you are satisfied with the overall results by following these steps:
- Alignment and aesthetics: ensure both you and the patient are happy with the alignment and overall appearance. Take photos and discuss the treatment goals to confirm they have been met
- Occlusion: check that the occlusion is comfortable and balanced. Assess ICP, lateral and protrusive movements, overjet, and overbite to ensure the final positioning is ideal
- Interproximal contacts: ensure there are no open spaces left from previous IPR by checking interproximal contacts with floss.
3. Removing attachments
Once you have checked all the above, then you are ready to finally fully remove the attachments.
Residual composite left on the teeth can be unsightly and rough for the patient. Here are some tips for removing attachments effectively:
- Time management: allow ample time for attachment removal—it often takes longer than expected
- Magnification and lighting: good magnification and lighting are essential to avoid damaging the tooth. Dry the teeth thoroughly to make residual composite appear chalky. An Optragate can help, and using a UV torch can highlight any remaining composite
- Use the right tools: experiment with a variety of burs and discs, including composite debonding burs, Soflex discs, enhance wheels and points, or even hand scalers for small flecks of composite. A combination of tools often works best
- Follow-up appointment: book a review appointment to ensure all composite has been removed, which can coincide with the fitting of removable retainers.
4. The aesthetic finish
Remember orthodontics makes teeth straight, not necessarily beautiful, especially when it comes to adults who may have chipped and worn incisal edges.
Ideally, you and the patient should have already discussed treatment options like enameloplasty or composite bonding to perfect the smile after aligner treatment.
These procedures are best done during the debonding appointment, after teeth whitening but before you scan for Vivera retainers.

5. Tooth whitening
Most patients will couple tooth straightening with tooth whitening.
So, ensure you have factored this in at the start when costing out the treatment as well. Vivera retainers can be used for Tooth Whitening, saving a big step here for you as the practitioner.
Take the patients initial shade and thereafter take your impression or scan for the Vivera retainers.
The last set of aligners can be trimmed to allow the patient to continue wearing them until their removable retainers arrive.
6. Retainers
Retention is crucial for maintaining the teeth’s new positions after orthodontic treatment. Studies show that the supracrestal periodontal fibres remain stretched and displaced for more than seven months after active tooth movement, but long-term retention is advised for life.
Fixed retainers
These can be placed directly with Ortho-Flextech wire or made in a lab using a stent. Fixed retainers offer immediate retention on the day of debonding and require minimal patient compliance, though they can be tricky to place and maintain. Be sure to instruct the patient on how to clean around the fixed retainer.
If you want to learn more about the direct placement of a fixed retainer, our Londec course provides comprehensive hands on coverage of this topic and more. See here.

Removable retainers
After the fixed retainer is placed, as mentioned earlier you can take your final scan or impression for removable retainers. Vivera removable retainers, available through the Invisalign Doctor site, offer an aesthetic and effective option, but patient compliance is essential.
The prescription form allows you to adjust the retainer to fit around fixed retainers or include bite ramps and pontics as needed. Patients receive three sets of Vivera retainers to ensure maximum compliance.
If you are providing tooth whitening, you can also now provide your chosen tooth whitening gel to your patients and review accordingly.
Wearing schedule
It’s a good idea to recommend that patients wear their removable retainers day and night for the first six months. After that, they should wear them nightly for as long as they want to maintain their straight teeth – ideally forever! Make sure to give both verbal and written retention instructions.
On ADA you will find a downloadable retention consent form.
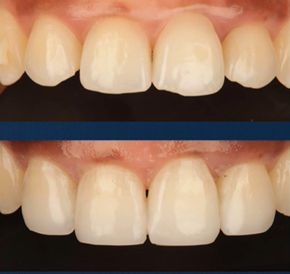
7. Final photos
Taking a full set of photos at the end of treatment is crucial for your records. Be sure to schedule time in the final appointment to capture these images. Not only are they great for patient celebrations, but before-and-after photos are also invaluable for showcasing your work to other potential patients.
Always ensure you have a signed photography consent form from the patient that specifies how and where the photos will be used.
By following these steps, you’ll ensure a smooth and rewarding conclusion to your Invisalign case, giving your patient the best foundation for long-term success with their new smile.
Want to dive deeper into the art of perfect case finishing? Join our ADA webinar, ‘The Devil is in the Detail: How to Successfully Finish an Invisalign Case‘ where you’ll find tutorial videos, expert advice and practical tips to master the final phase!
This article is sponsored by Aligner Dental Academy.

