Dimitri Kisel presents a challenging implant restoration case of an UR1 tooth, in which a precise shade analysis created a natural-looking, aesthetic result.
Opinions often differ.
Some technicians argue that pleasing, aesthetic results are dependent on the shape and morphology of the teeth. However, others believe that custom shade reproduction of the teeth the key to success.
To avoid an academic debate, I offer a compromise: both opinions are important.
A major challenge for all dental technicians is to fabricate a single anterior crown and define the different criteria to deliver the necessary aesthetics and function: precision (incisal edge, etc), tooth shape (micro, macro texture and morphology), tooth shade (both the basic shade of the tooth as well as the chroma characteristics).
In this article we will focus on the determination of the shade of the teeth and their reproduction while considering the above criteria.
The case
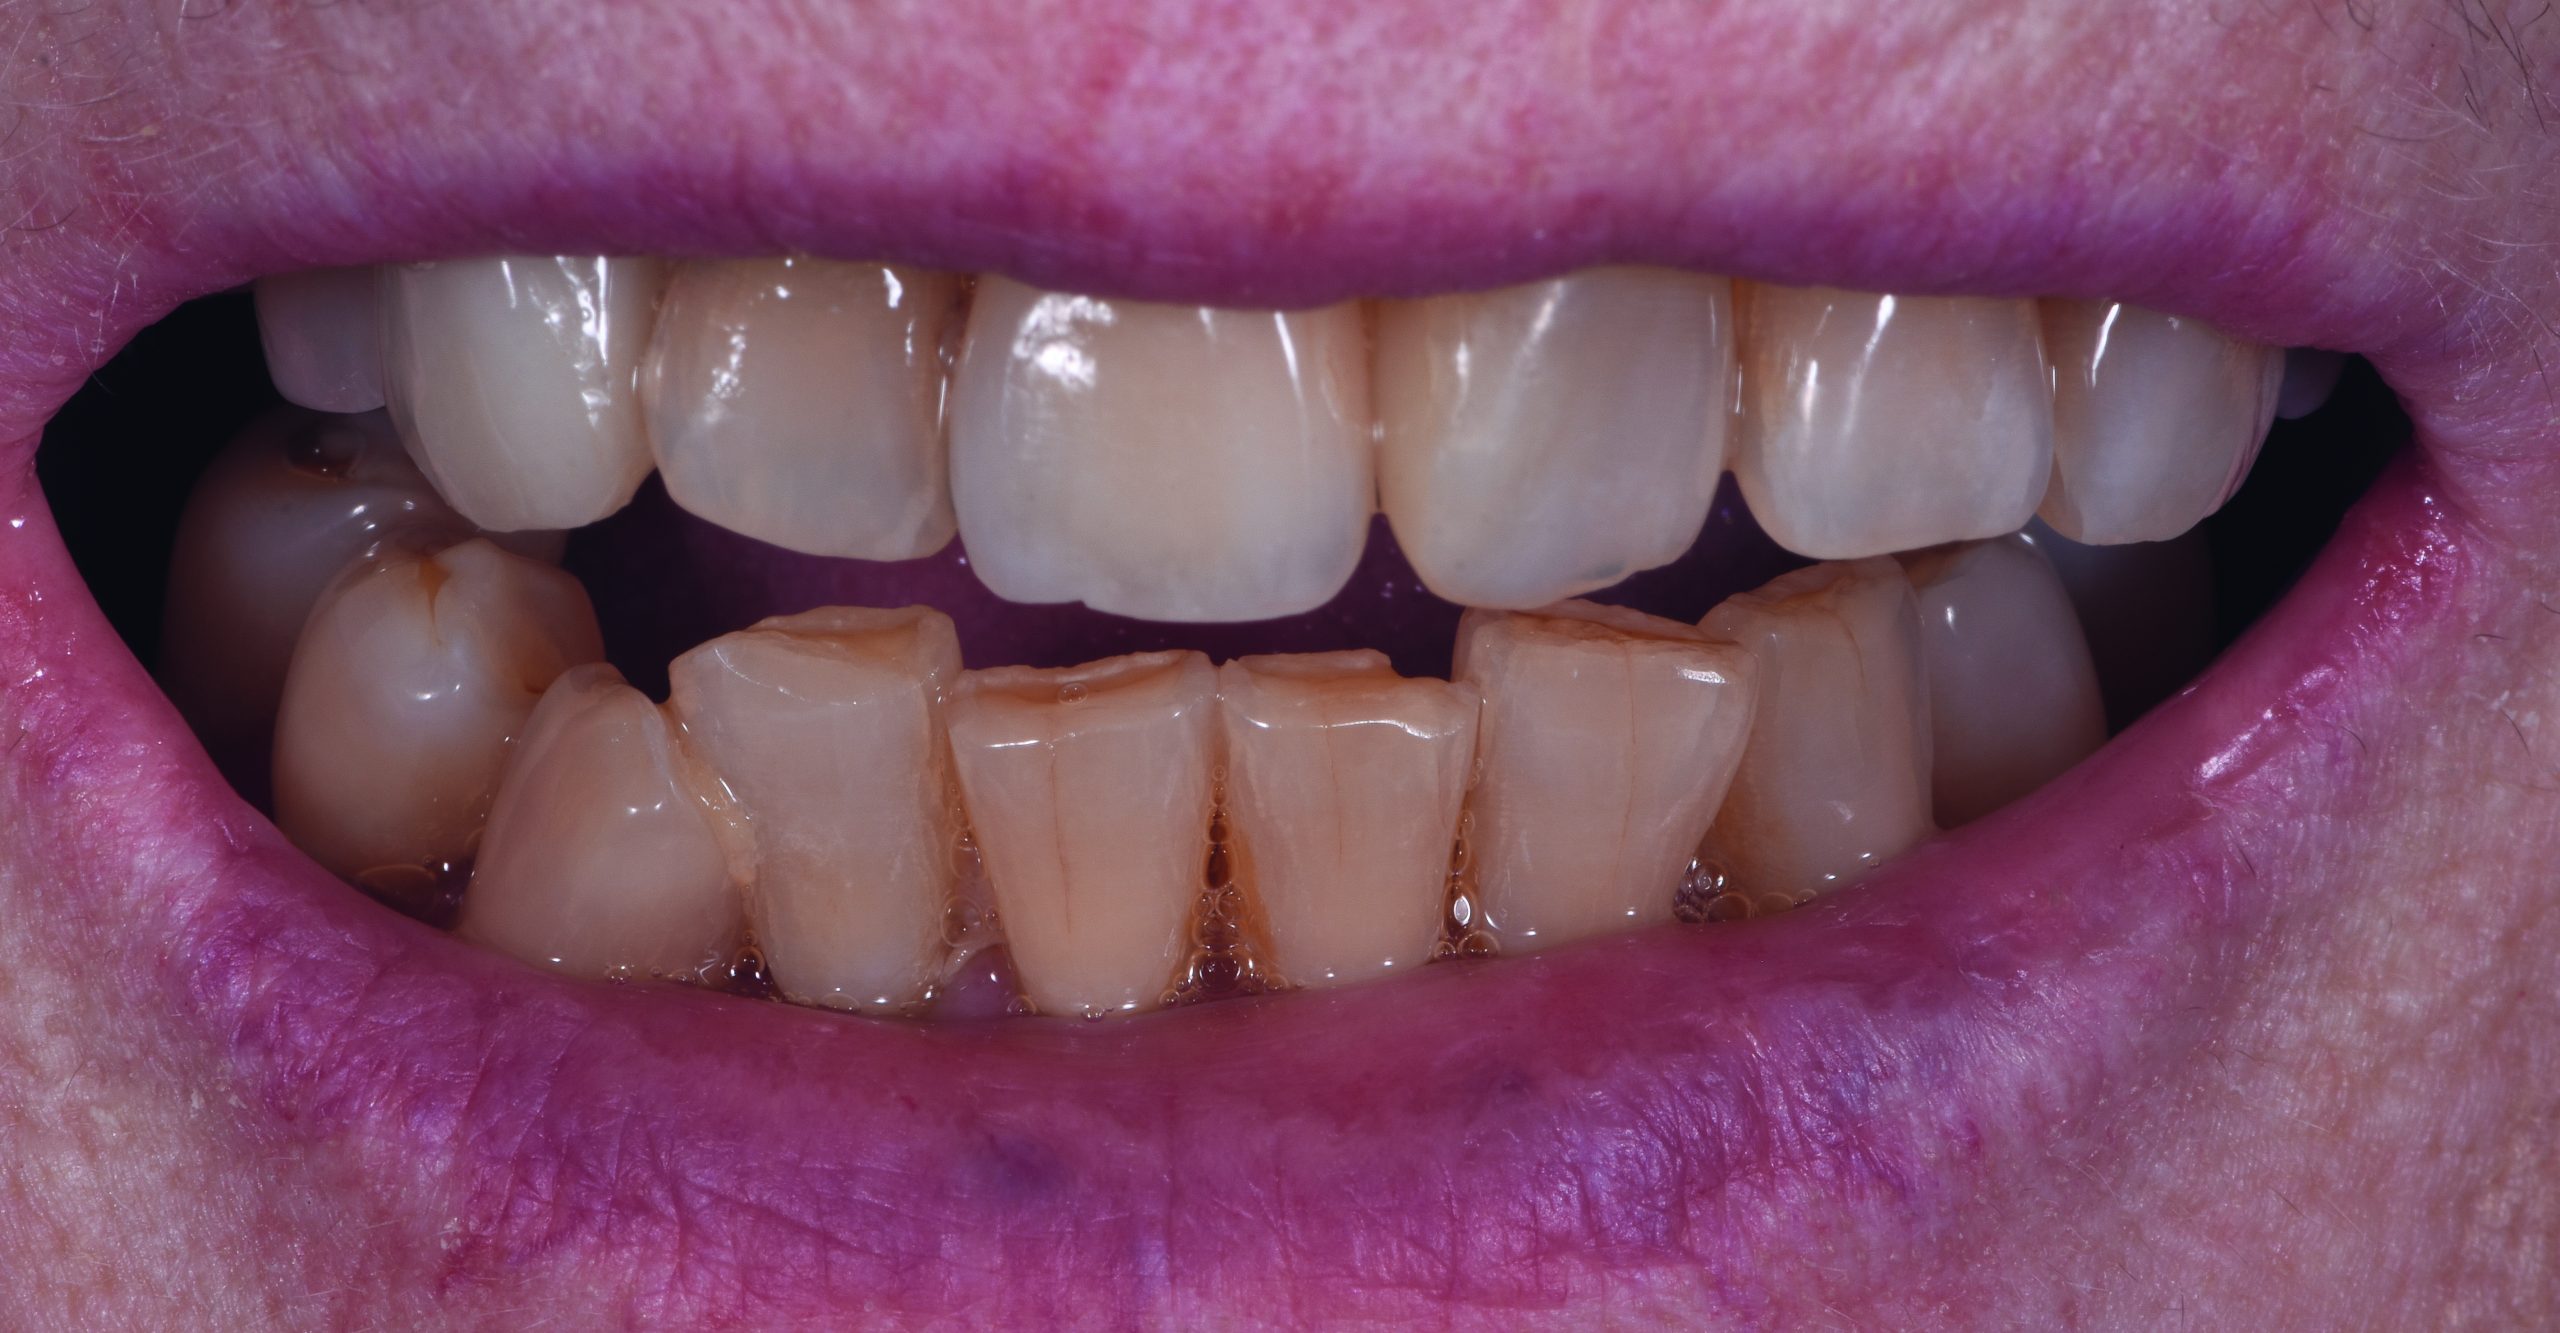
A 70-year-old patient presented to the dental office with a chief complaint regarding their UR1.
Clinical examination determined that the tooth was not viable for restoration. As a result, the removal of the tooth was recommended.
Treatment options were then discussed with the patient in the presence of the clinical and technical team involved in the resolution of the case.
A decision was made to restore the area with an implant and zirconia crown.
The superstructure would be a hybrid abutment (with a zirconia crown cemented on a titanium base). In addition, the material recommended for the two-part framework was zirconium oxide using a layered technique.
We used an individual abutment as it allowed for a more natural emergence profile.
Hybrid footprint/model/abutment
After insertion and osseointegration of the implant, impressions were taken and models were fabricated.
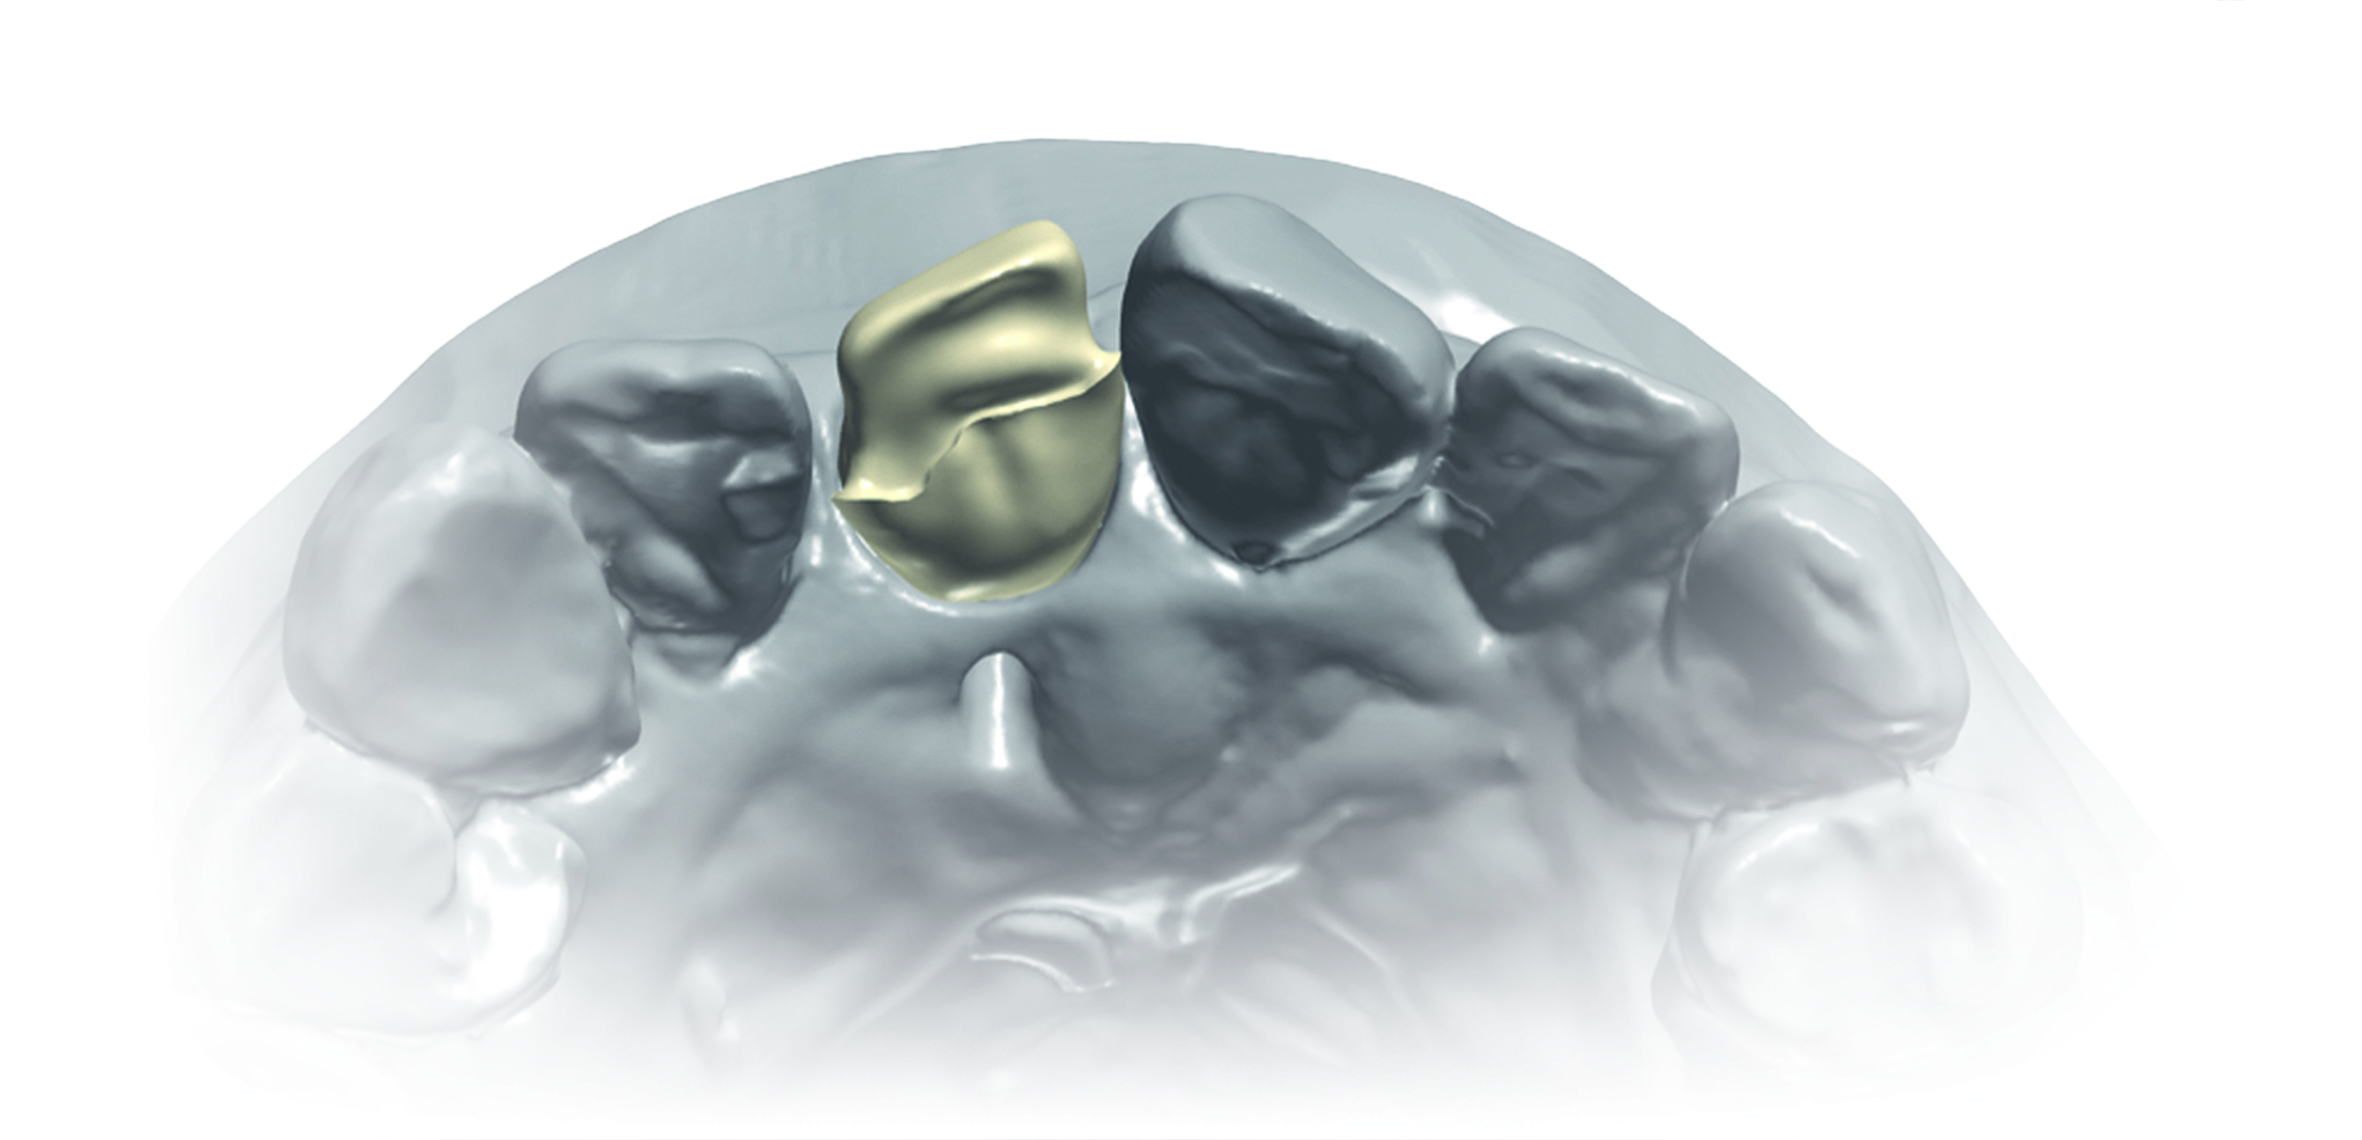
The upper model was then scanned, and an individual abutment was designed (Figure 1).
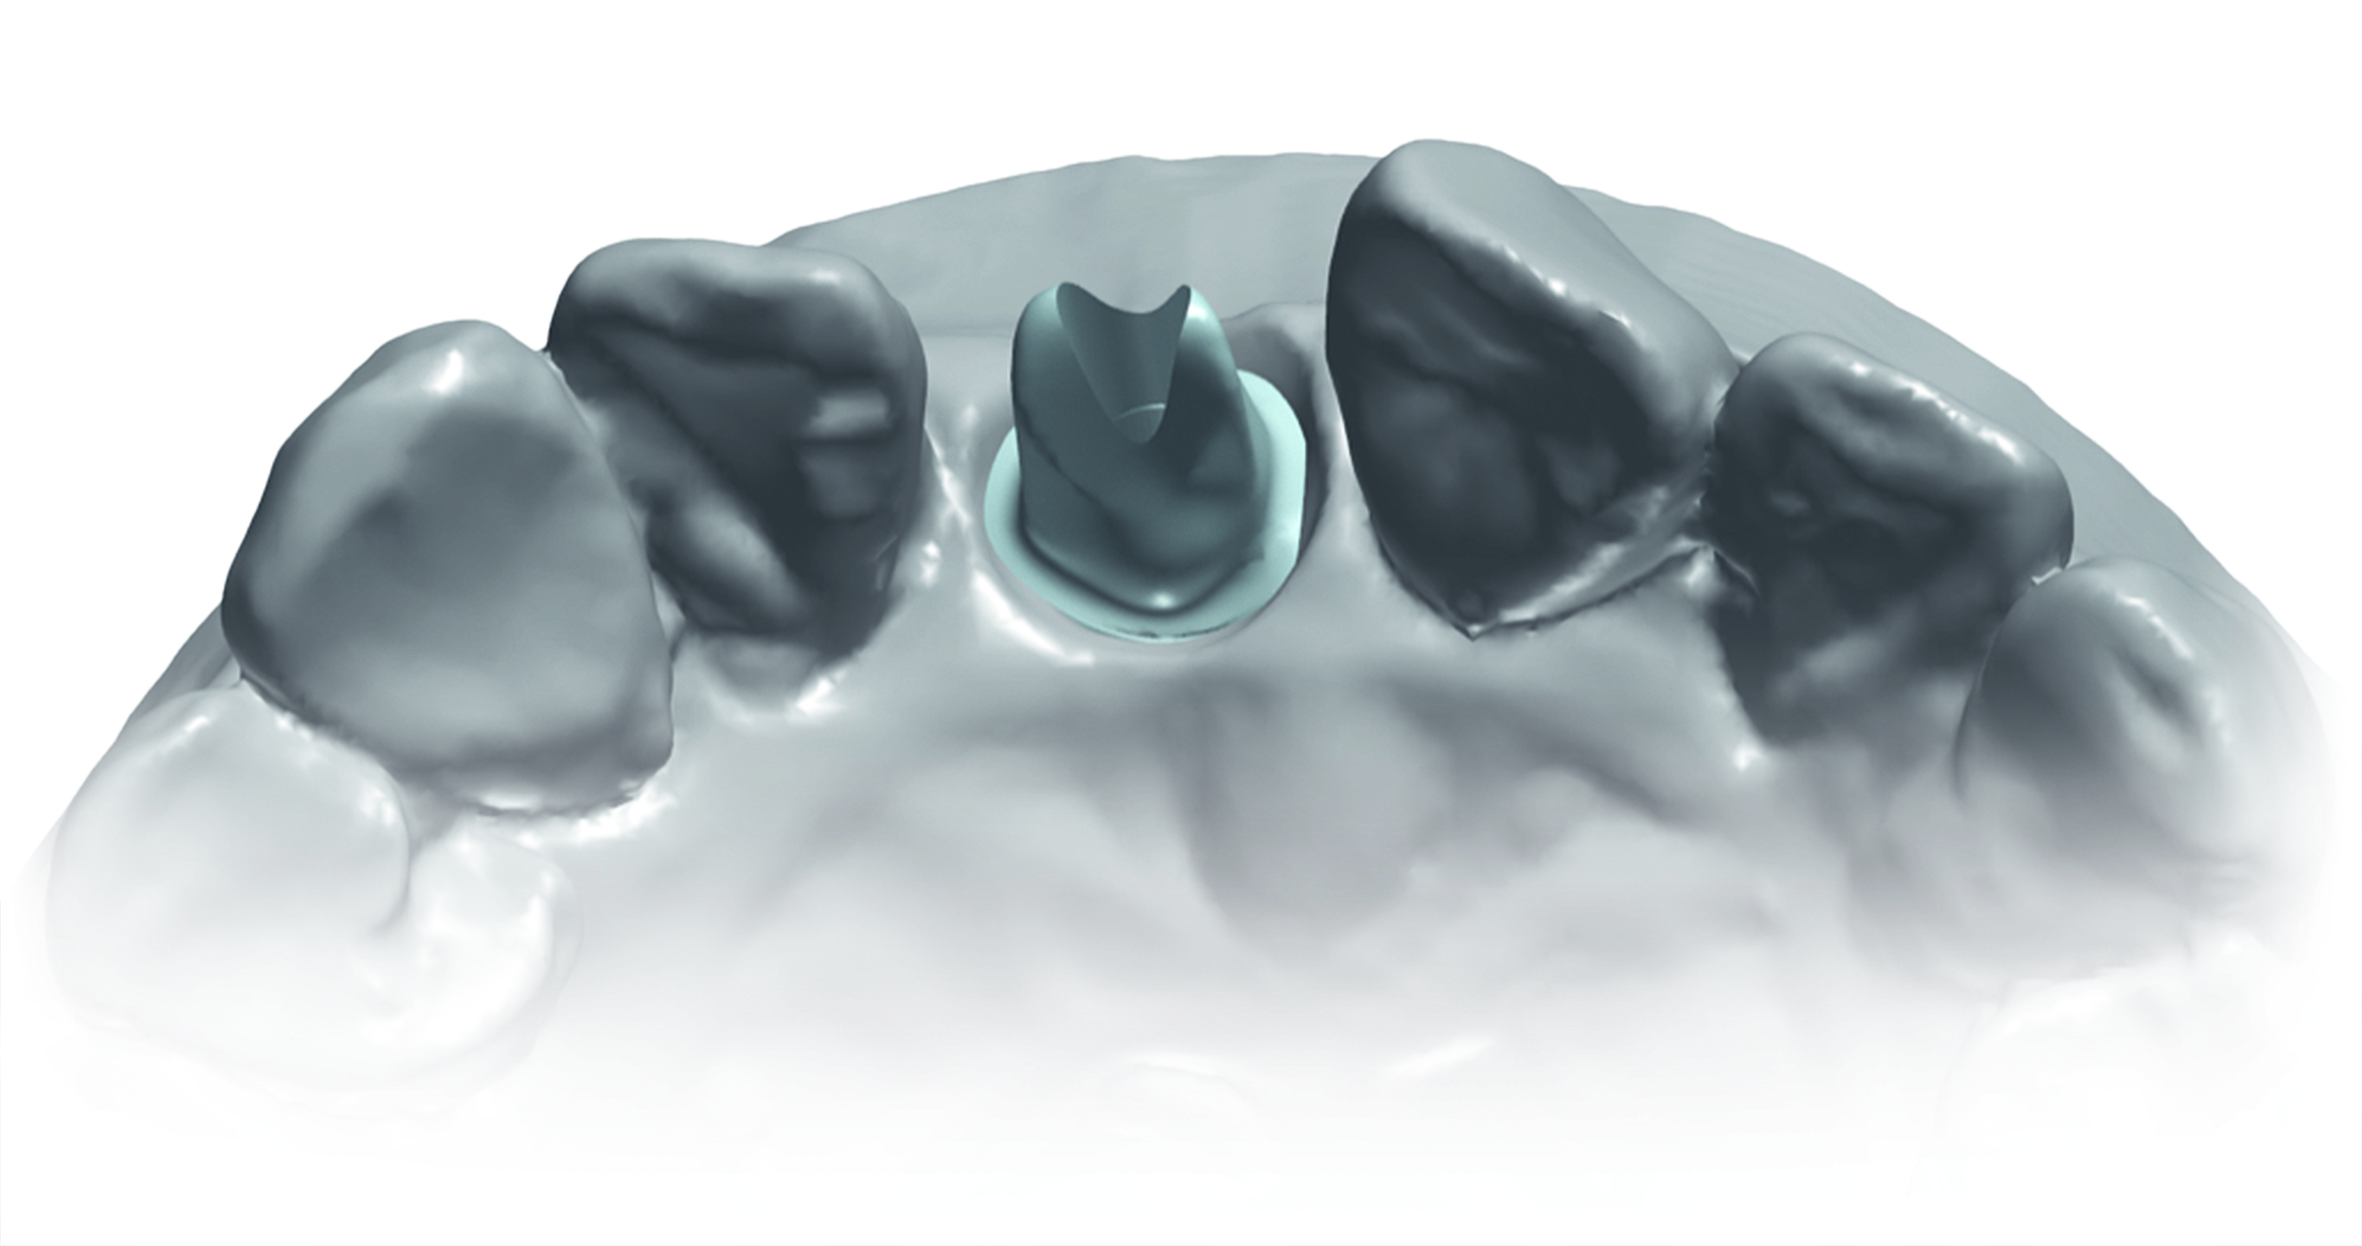
In this case, the abutment was designed with the 3shape CAD software.
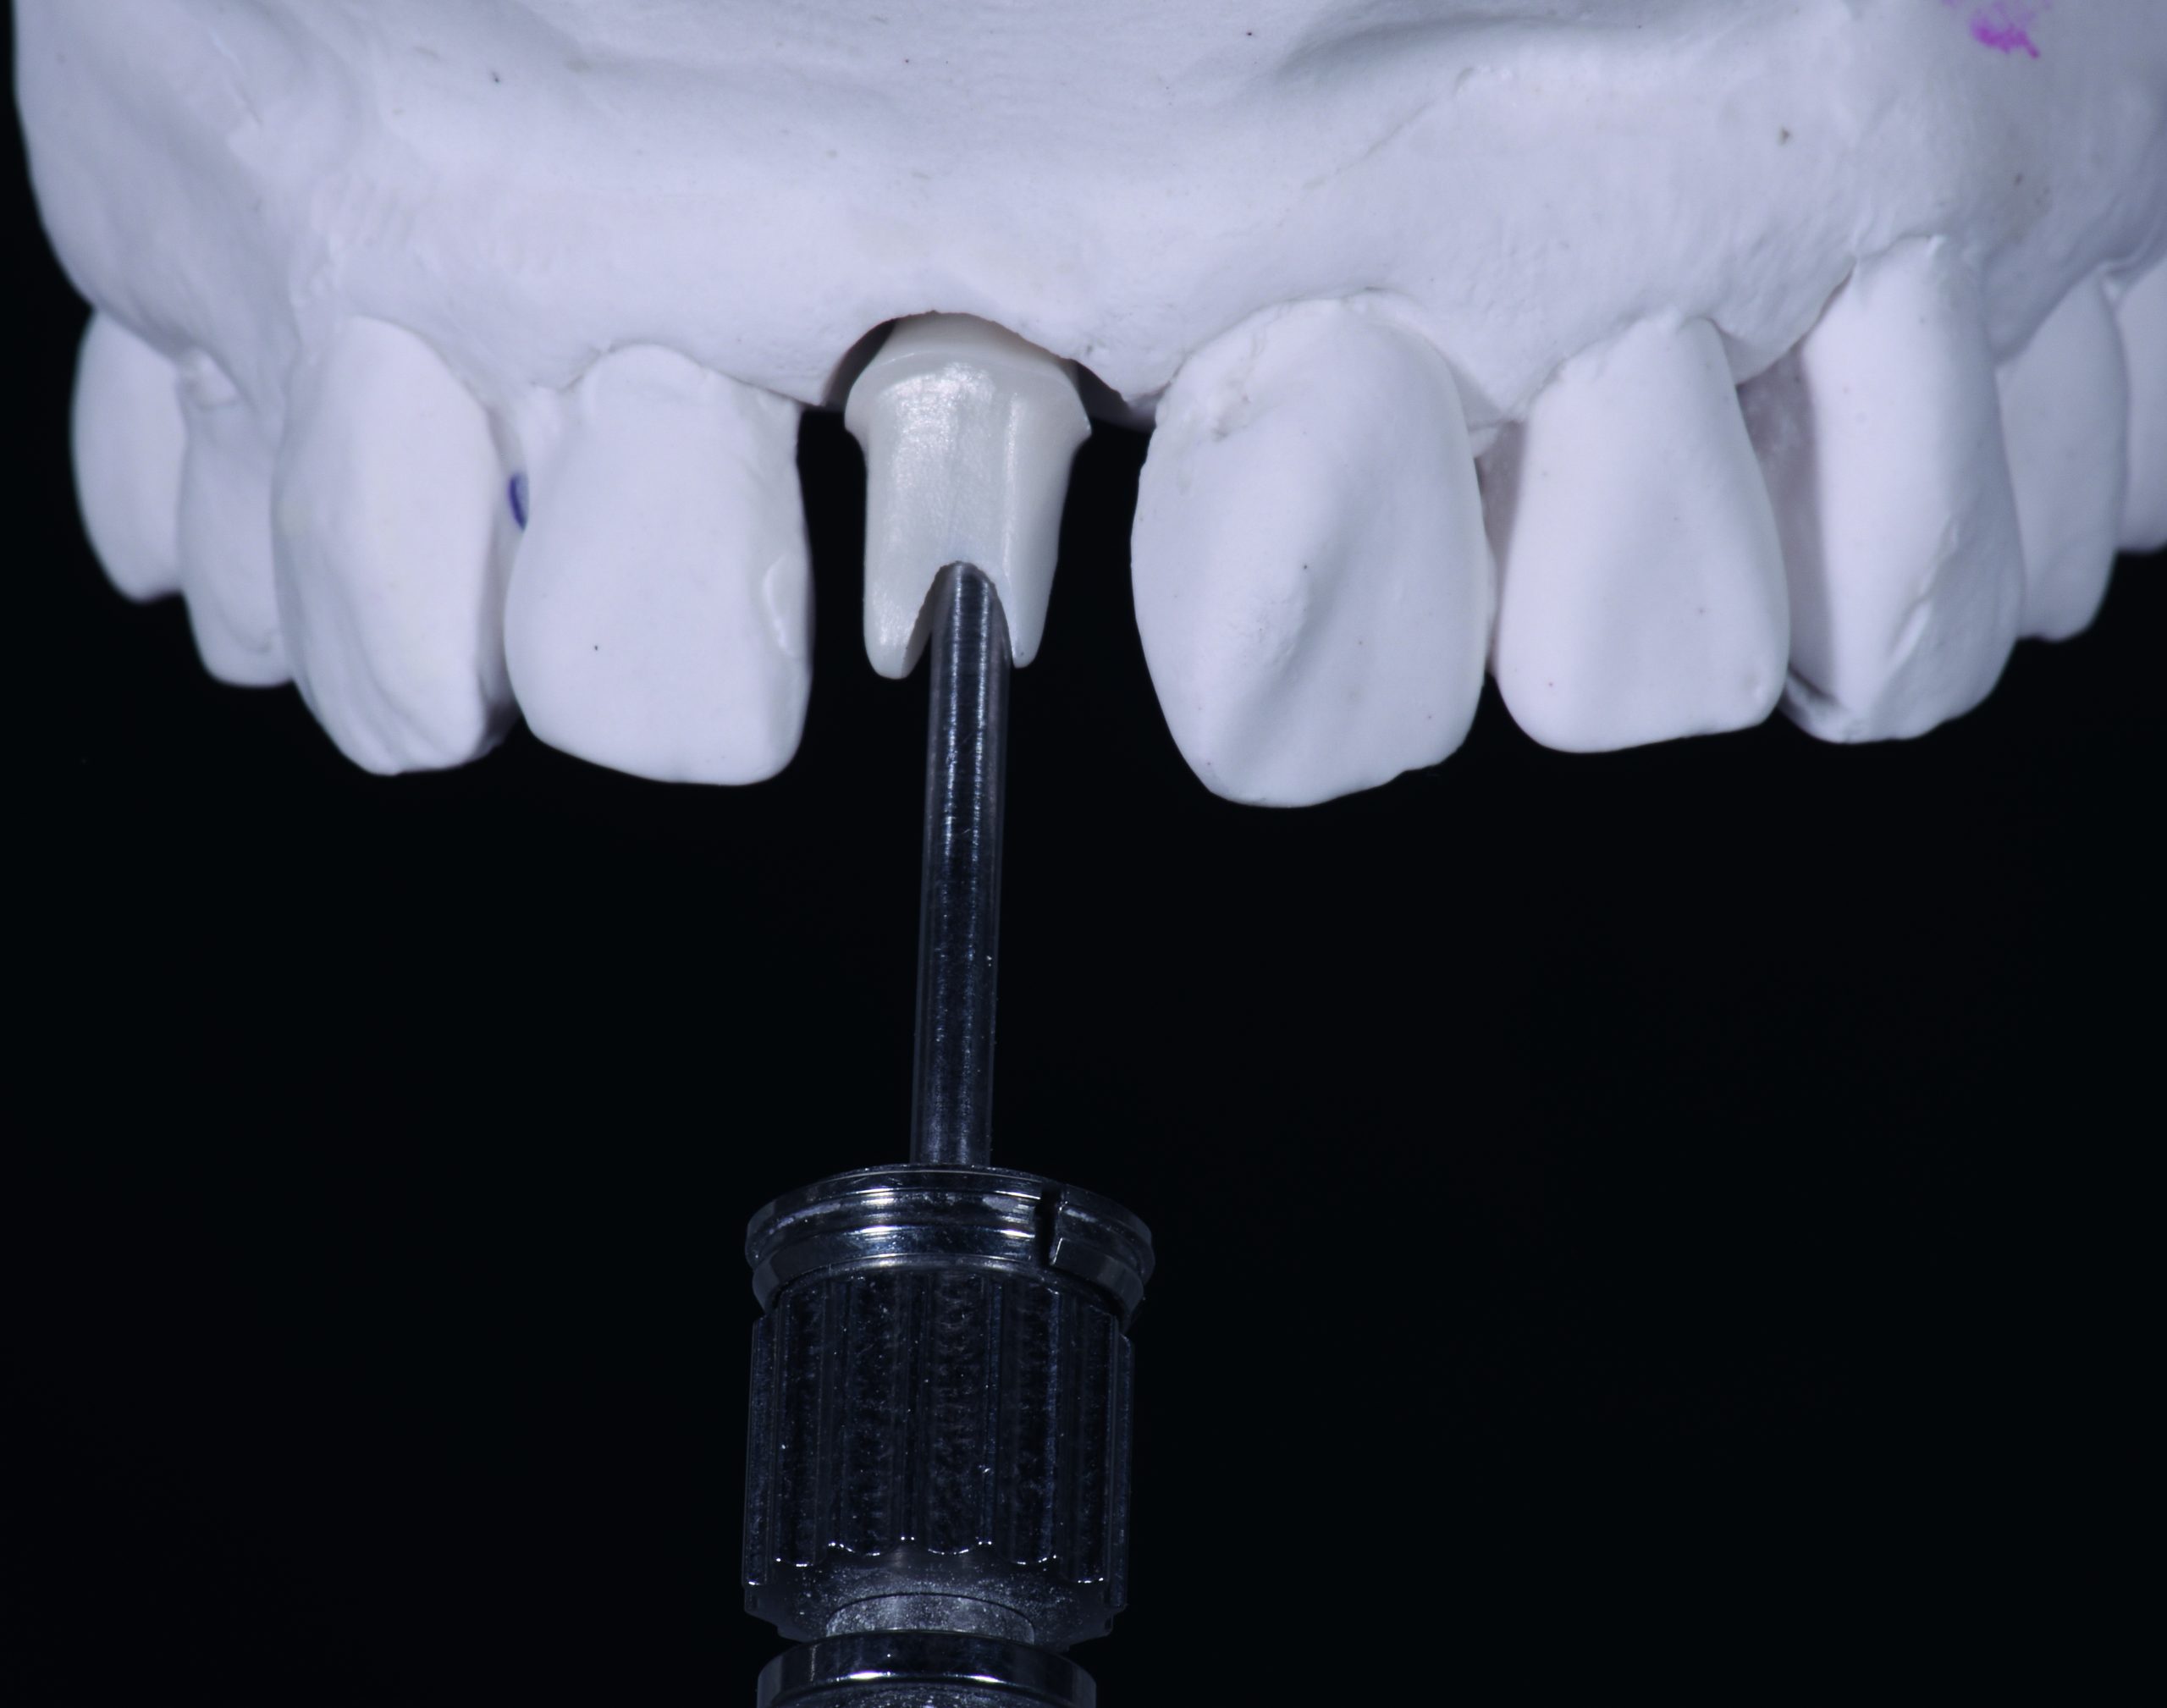
The computer-aided implant structure was milled with an in-house milling machine from multilayered zirconium oxide. Also, by means of a universal composite extraoral composite, it was bonded to the titanium base in the laboratory.
After the adhesive had hardened and the excess was removed, the transition between the implant and the superstructure was then cleaned and polished with the aid of several rubber discs.
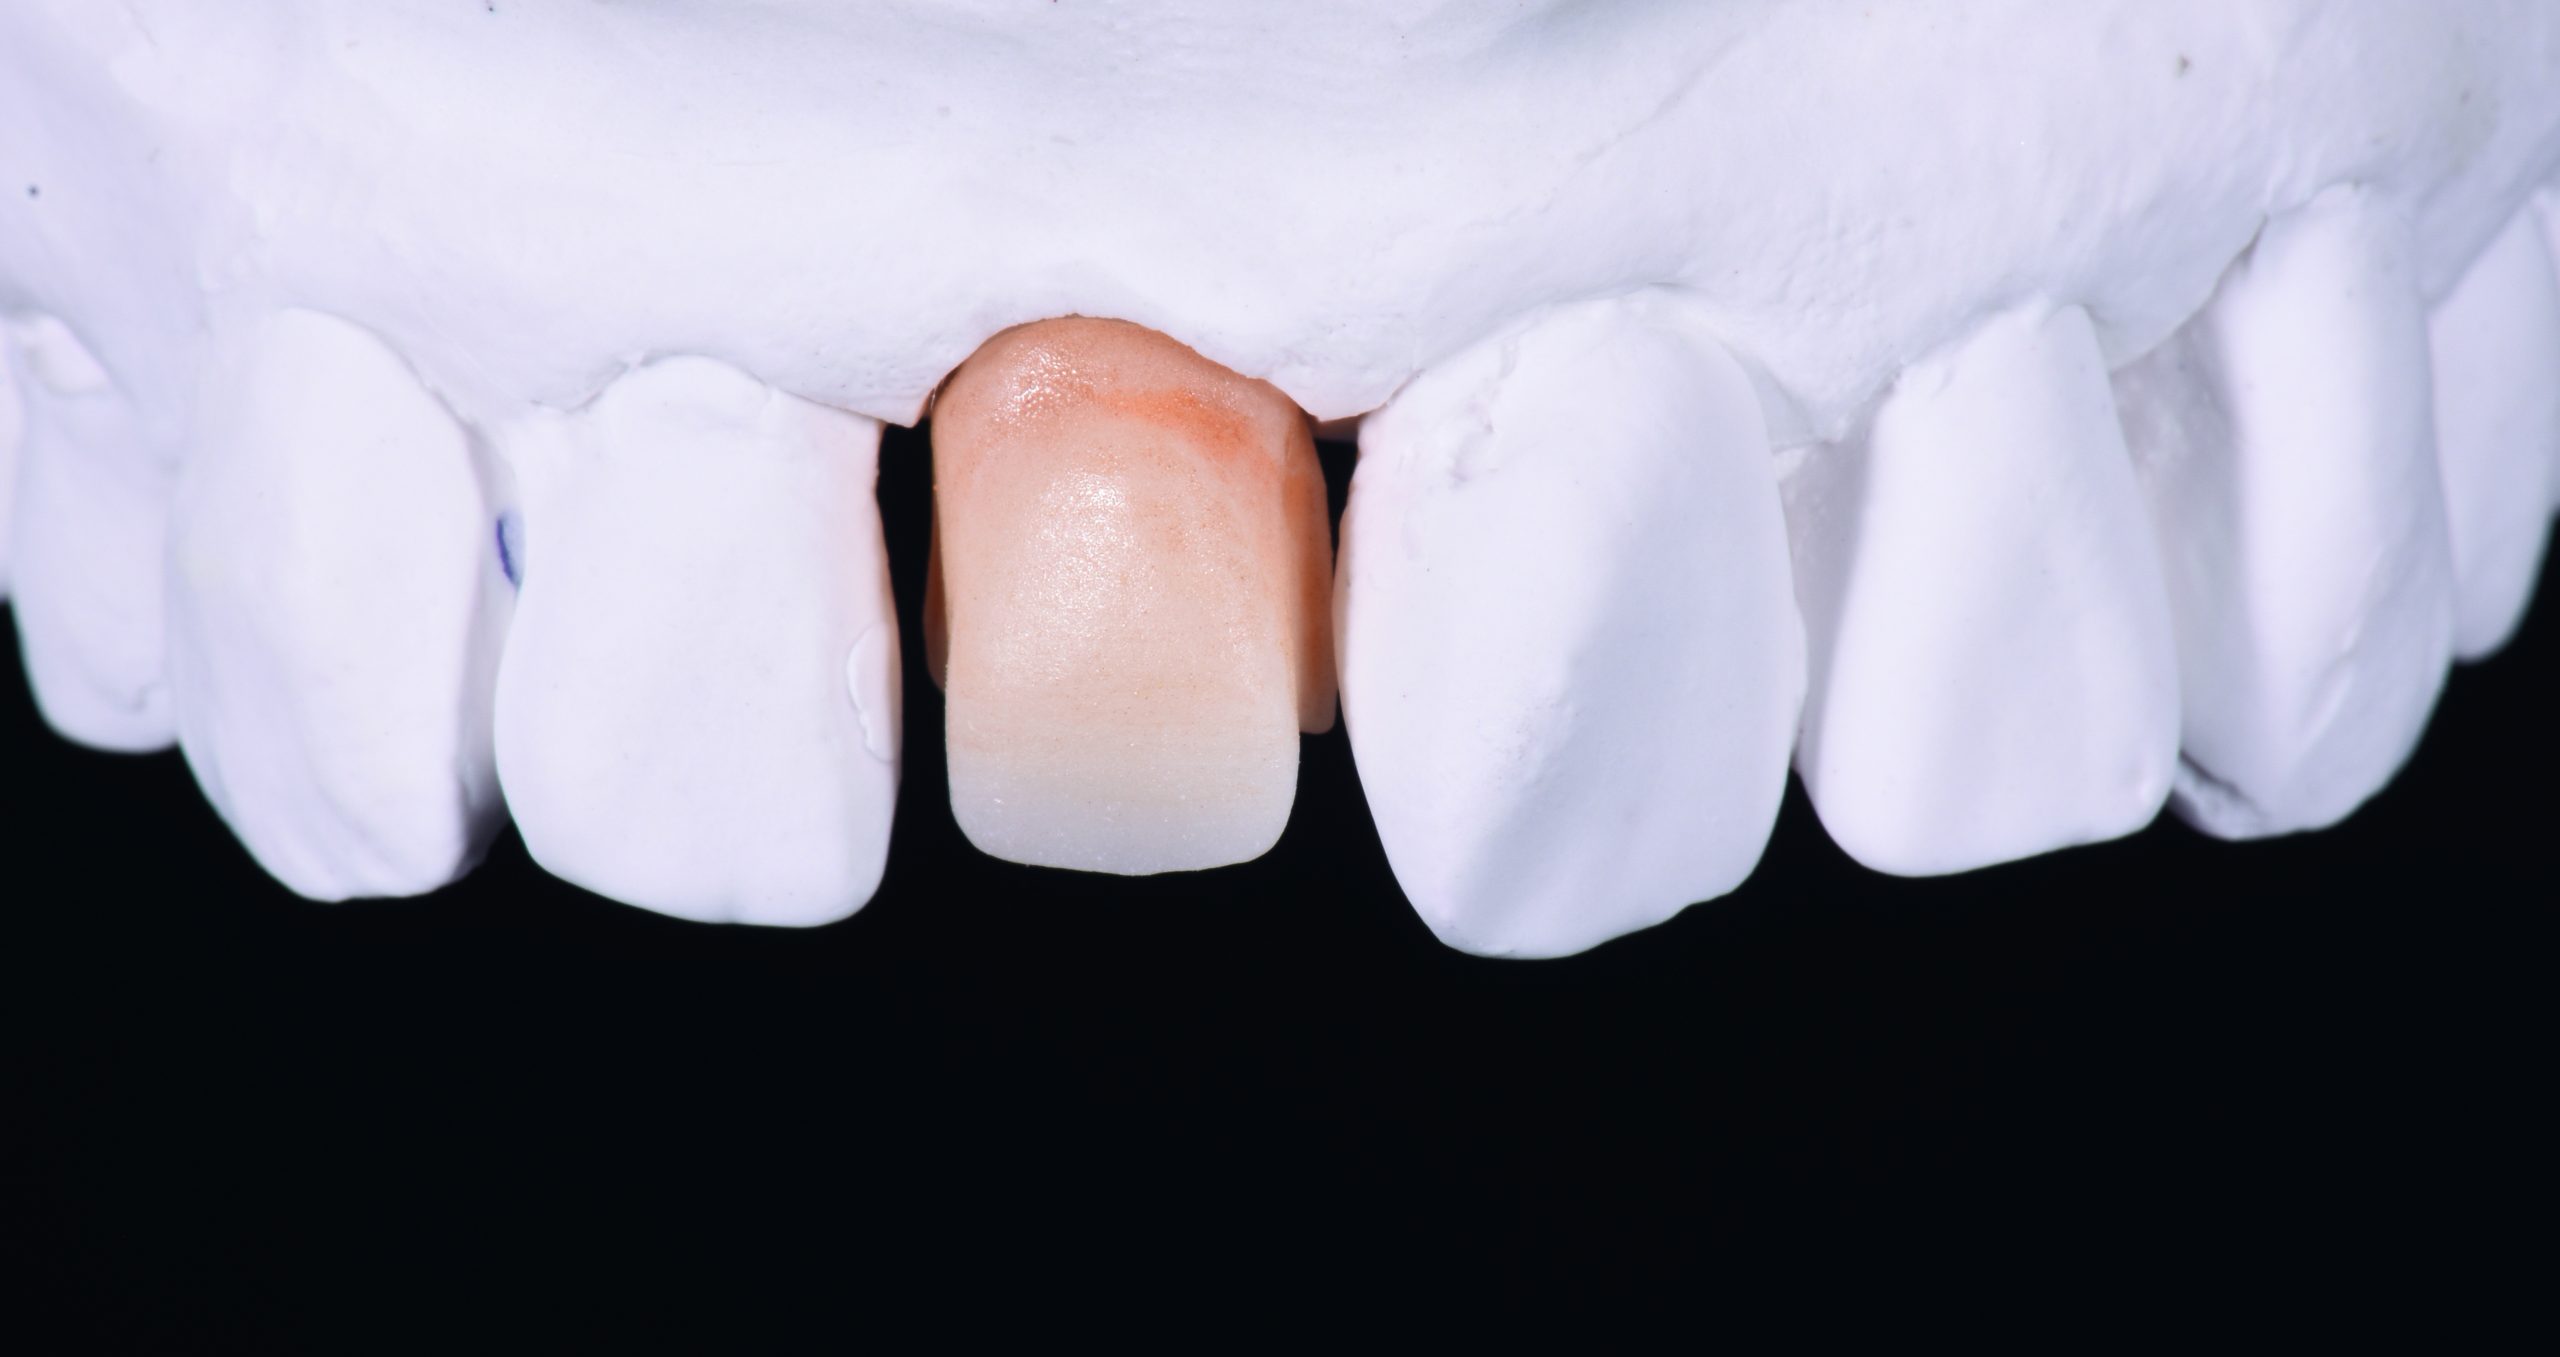
The hybrid abutment was then screwed onto the working model for the subsequent steps (Figure 2).
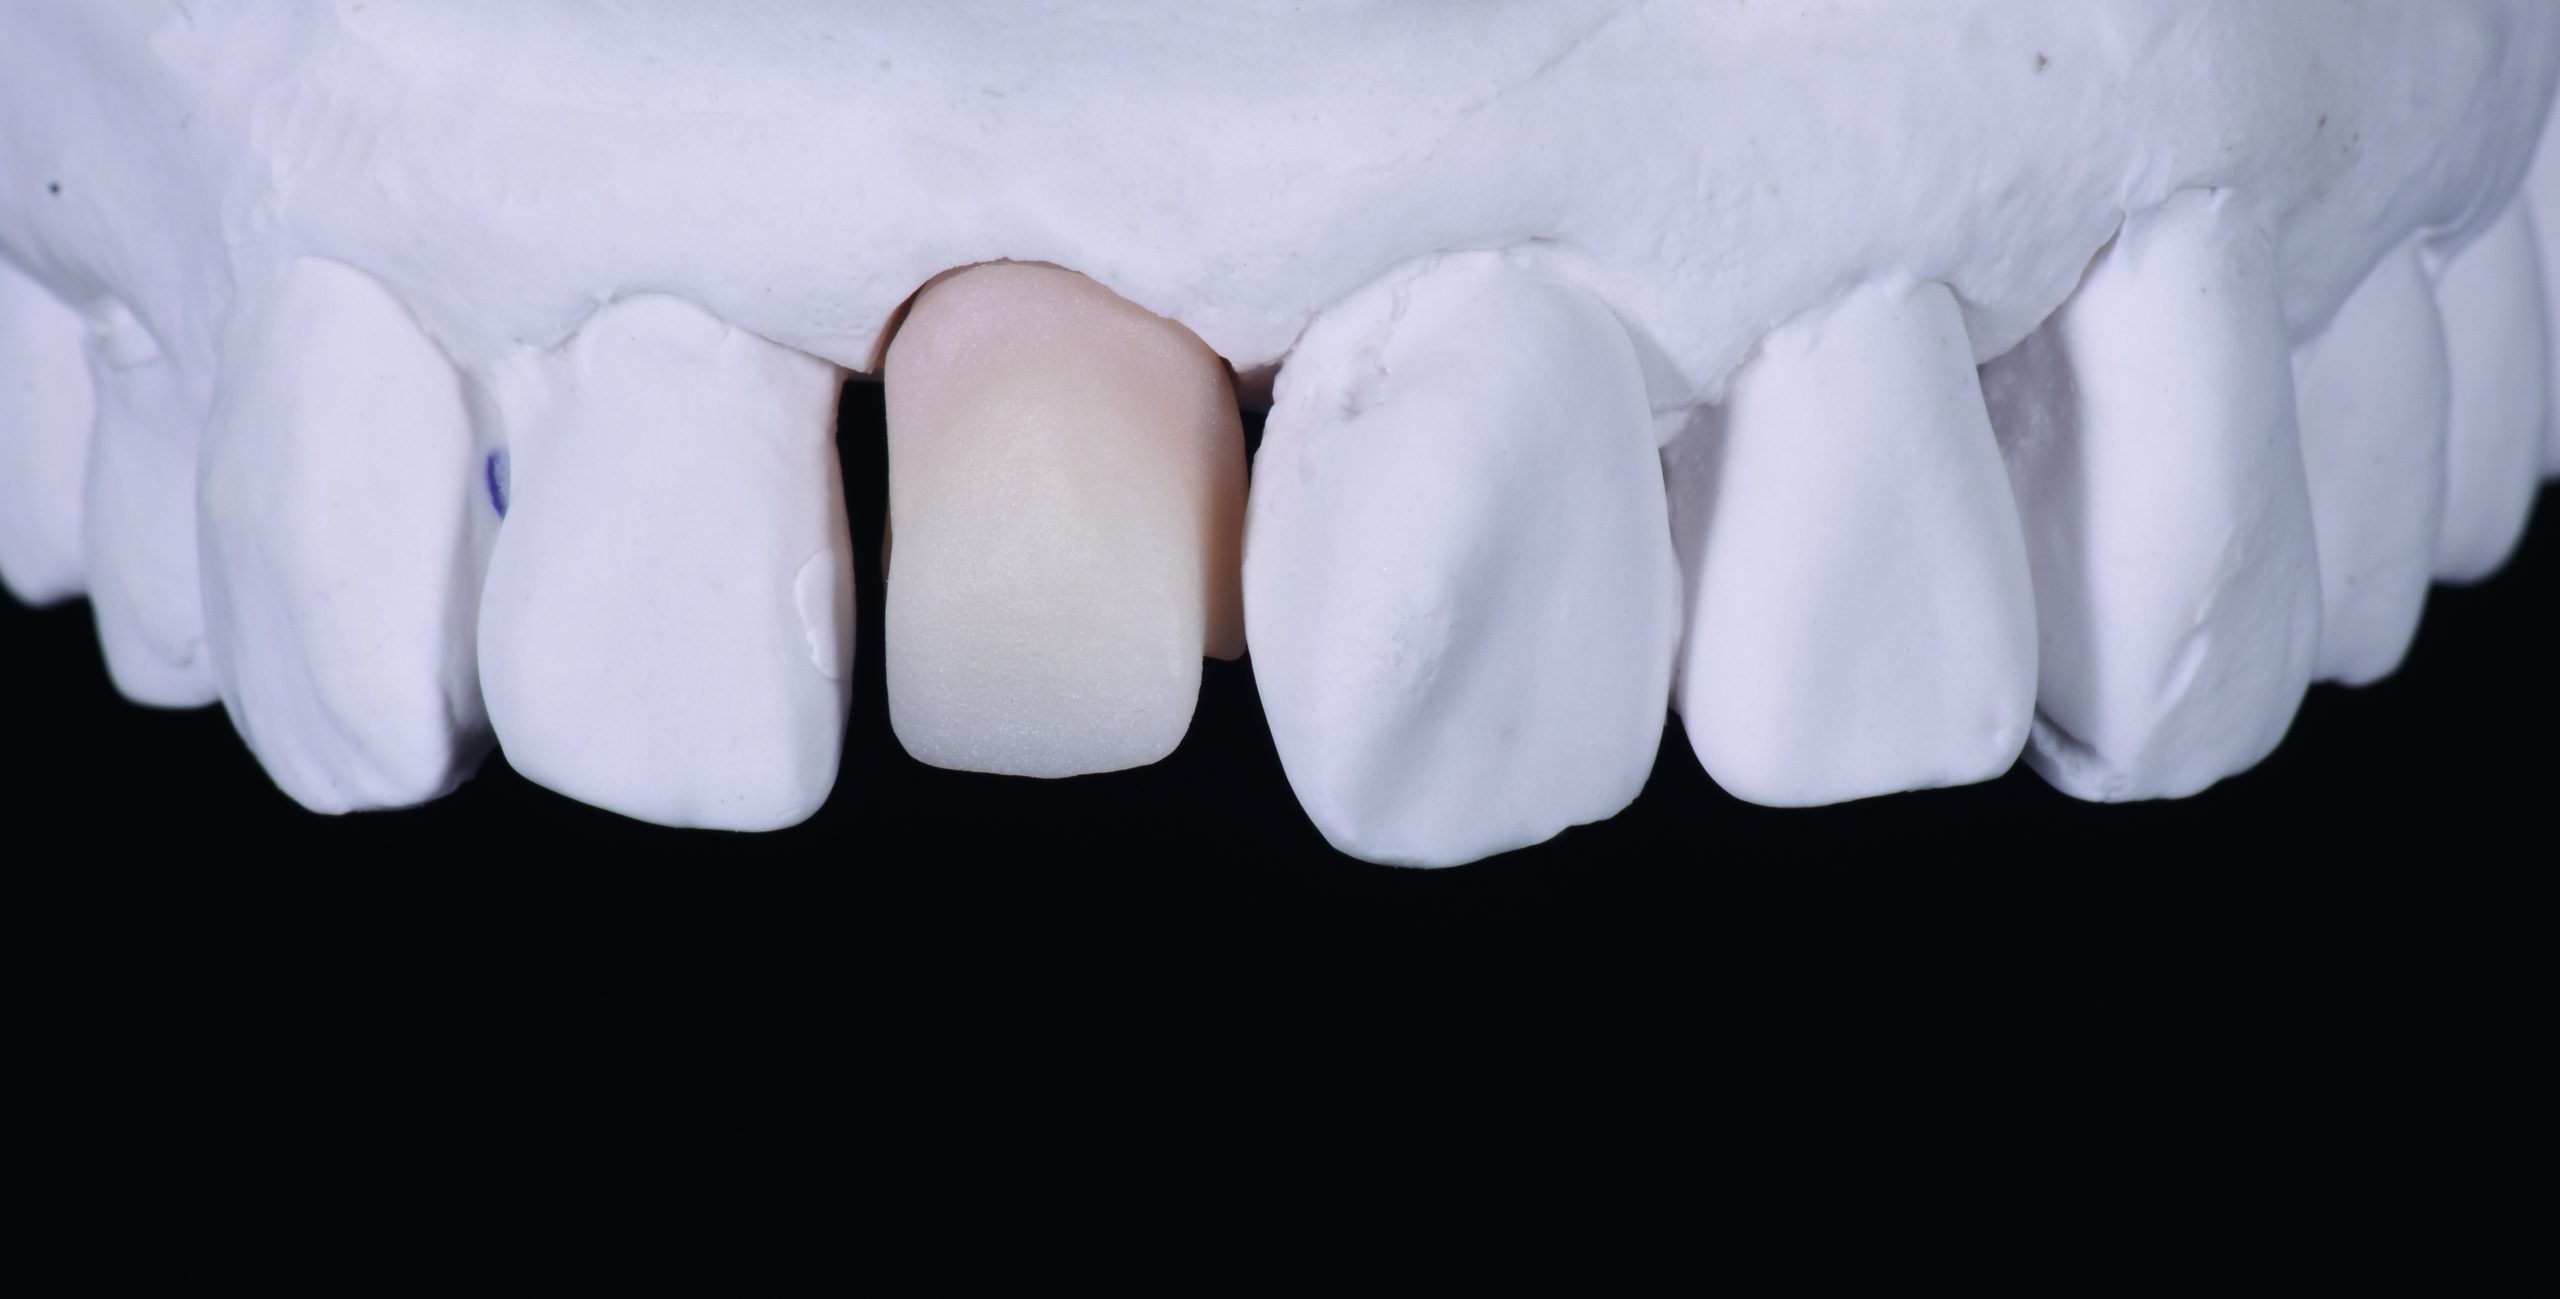
In the design of the subgingival portion of the abutment, care must be taken to ensure that there is a pronounced concavity. The area should be designed in such a way with as little pressure as possible on the gingival collar.
The area starting just below the emergence profile is the supragingival shade of the restoration and should be designed in such a way that it corresponds to the natural emergence profile (see Figure 5).
In the next step, we created the base for the stratification and initiated an analysis of the shade of the tooth.
Basic information on determining of tooth shade
Comparison of photographic images of the patient’s dentition is a very important step in determining the base shade and its chroma characteristics.
Unfortunately, many people still neglect this step which is of great importance.
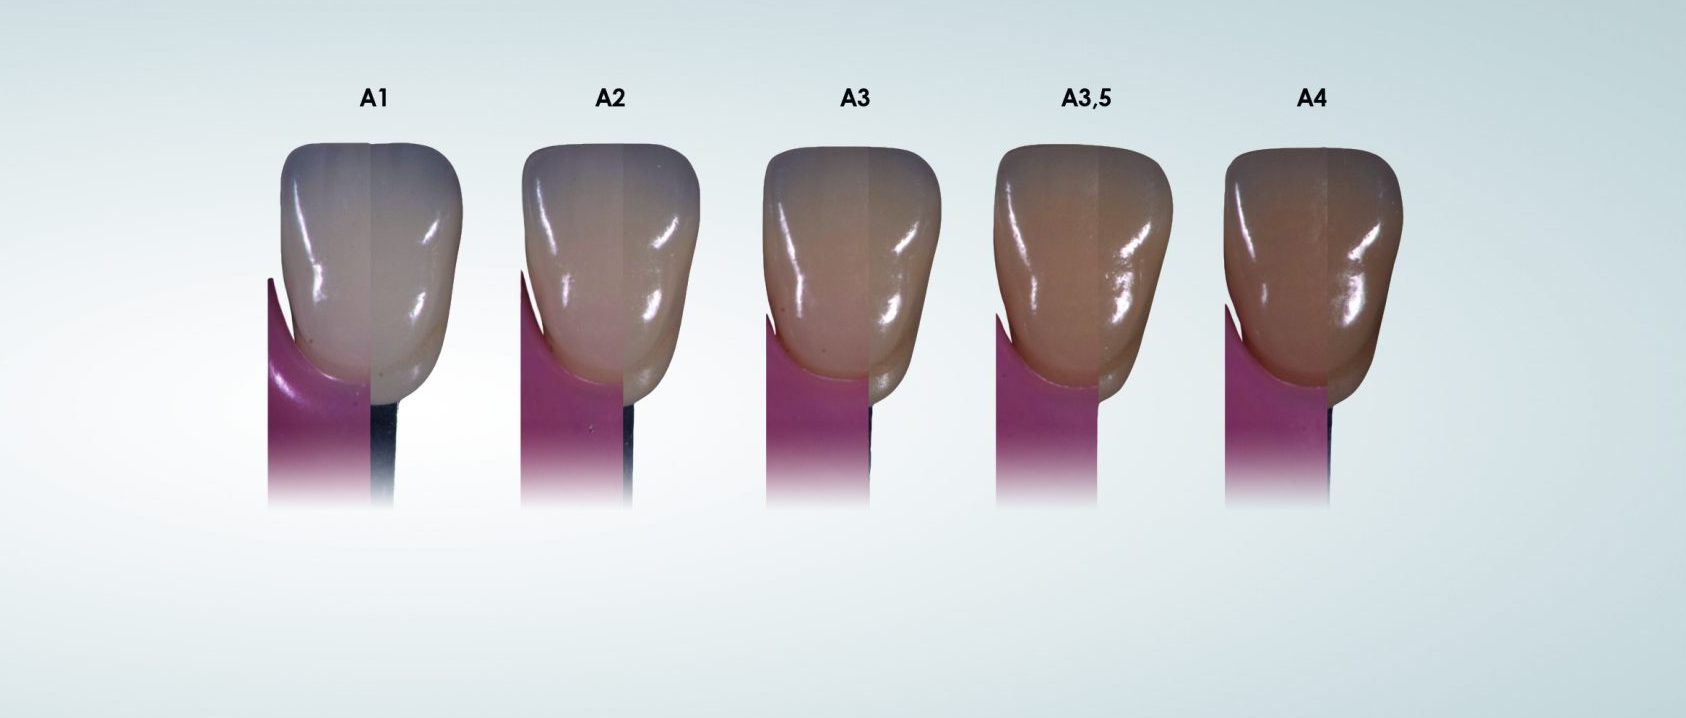
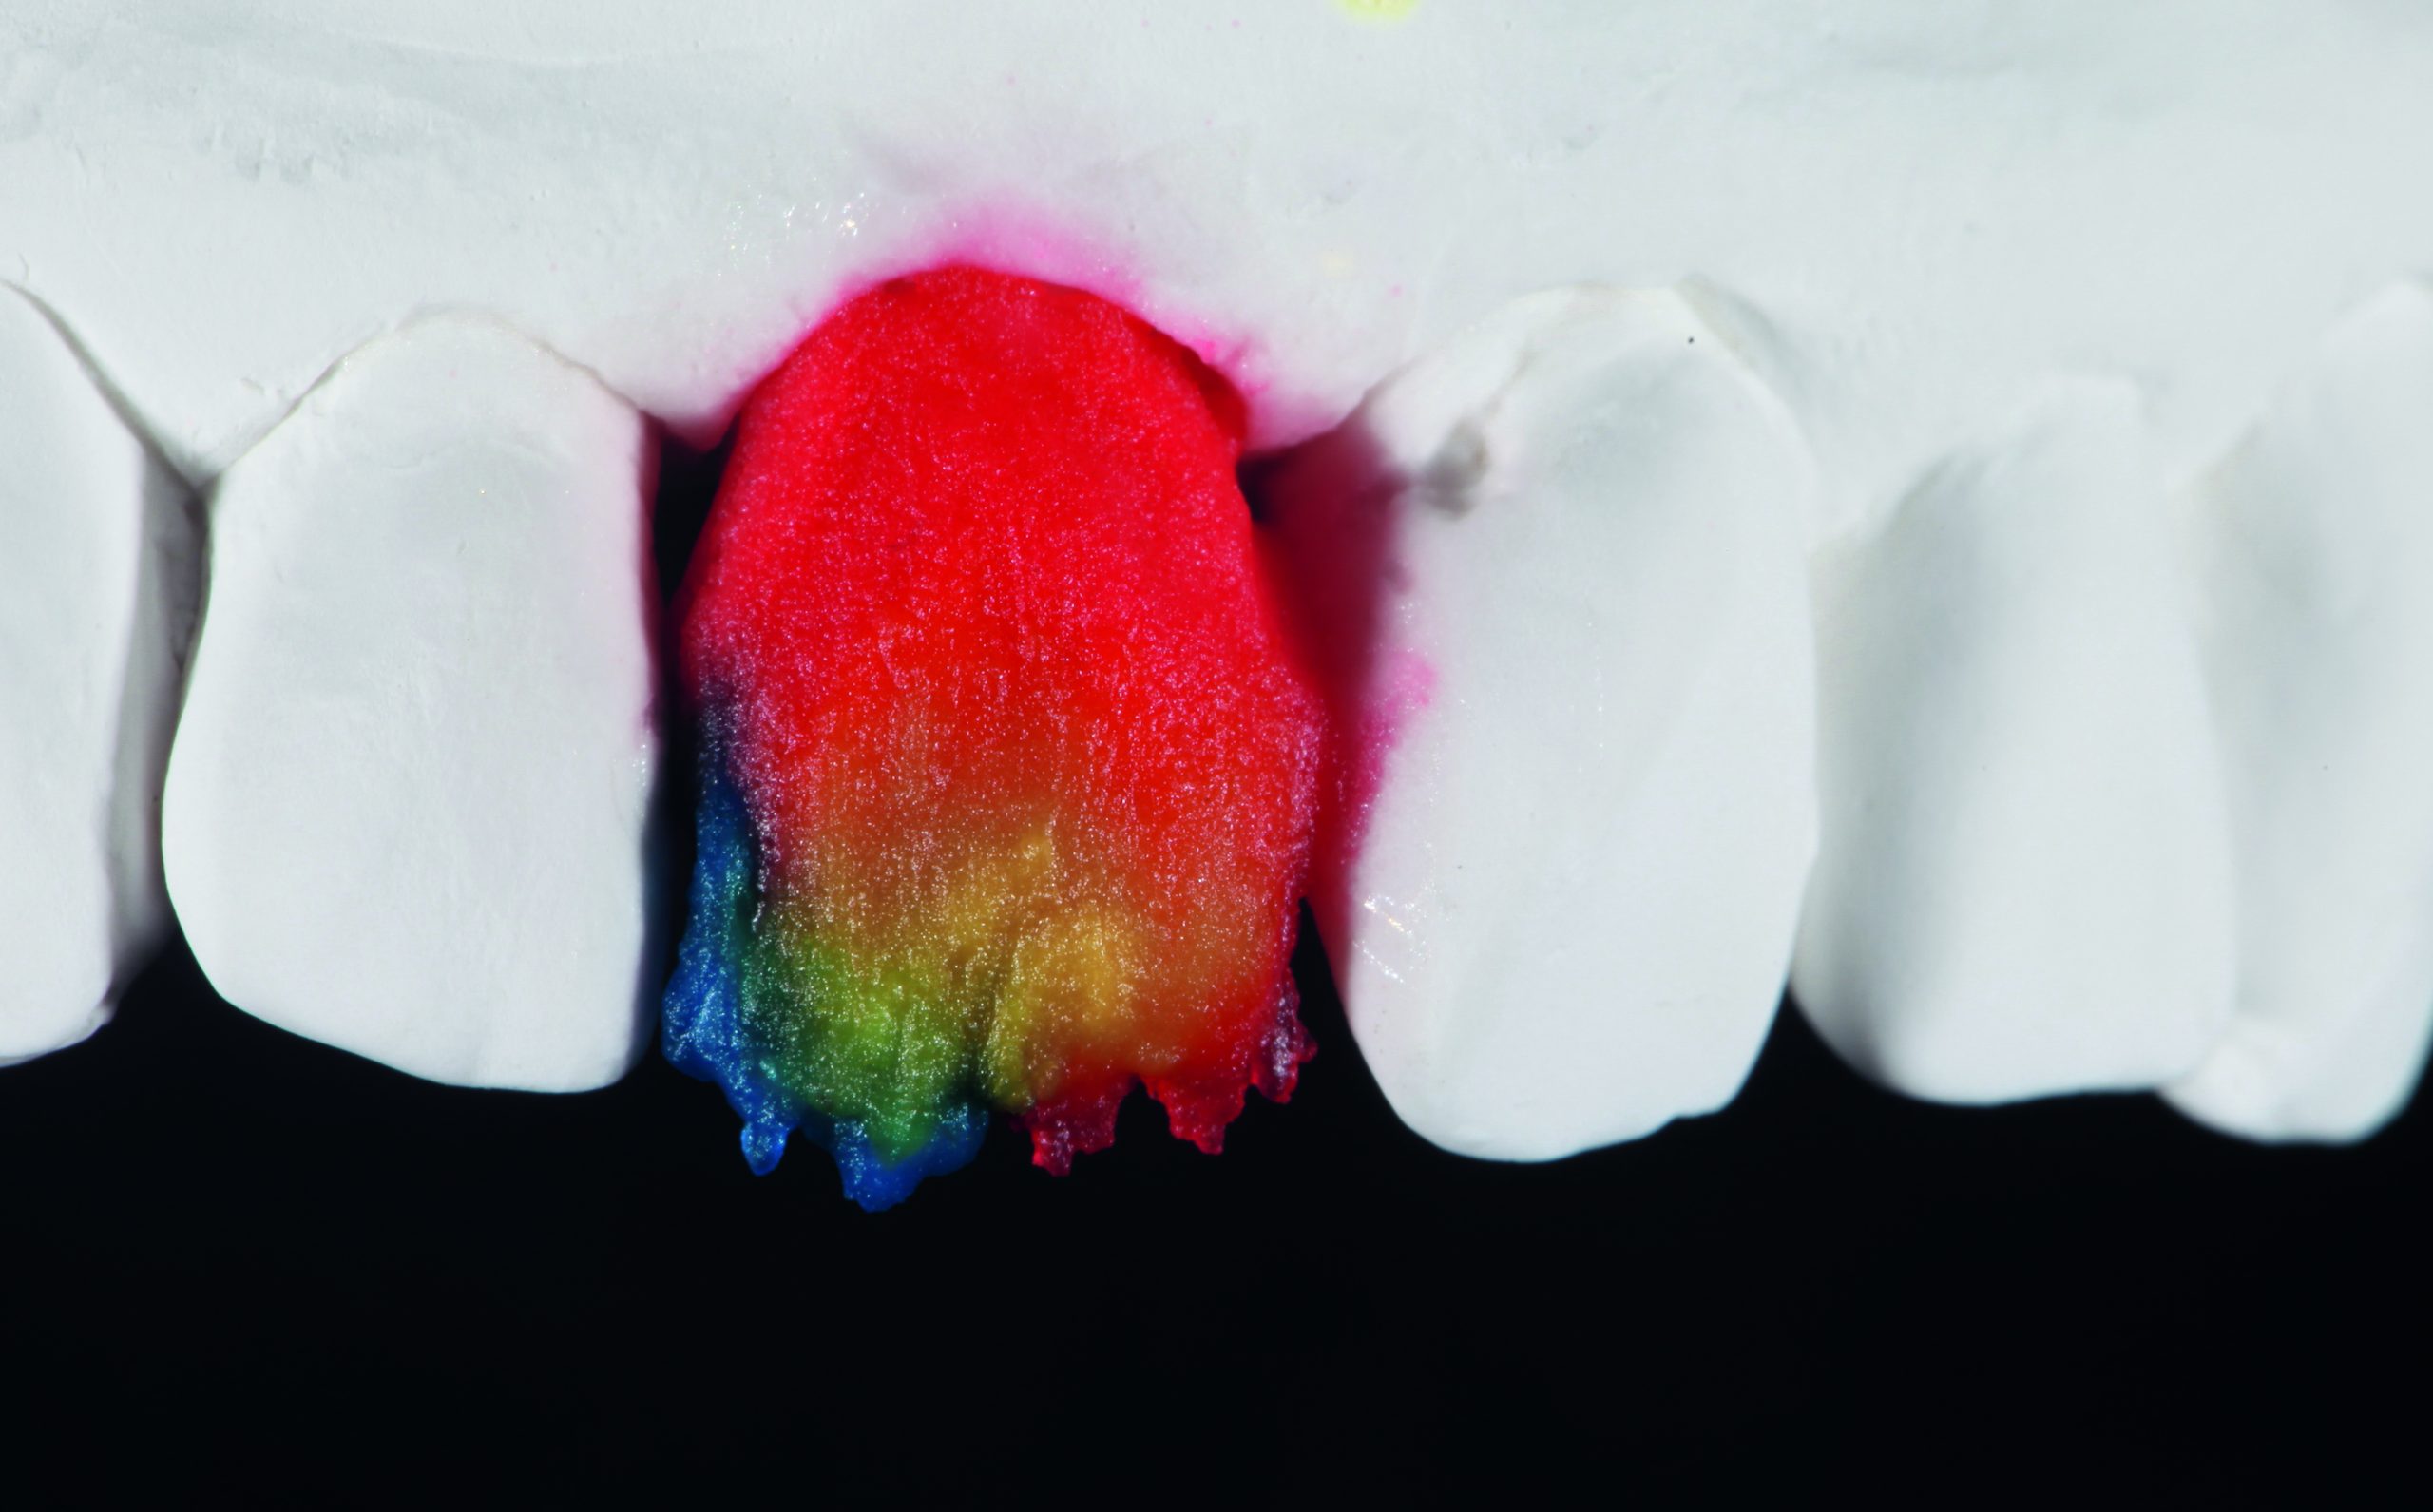
Essentially, the concept of shade determination is based on master dental technician Arnold Drachenberg’s Dragon Shade System. It uses a special sample holder which takes into account the considerable influence of the gingiva on the colour of the tooth (Figures 3a and 3b).
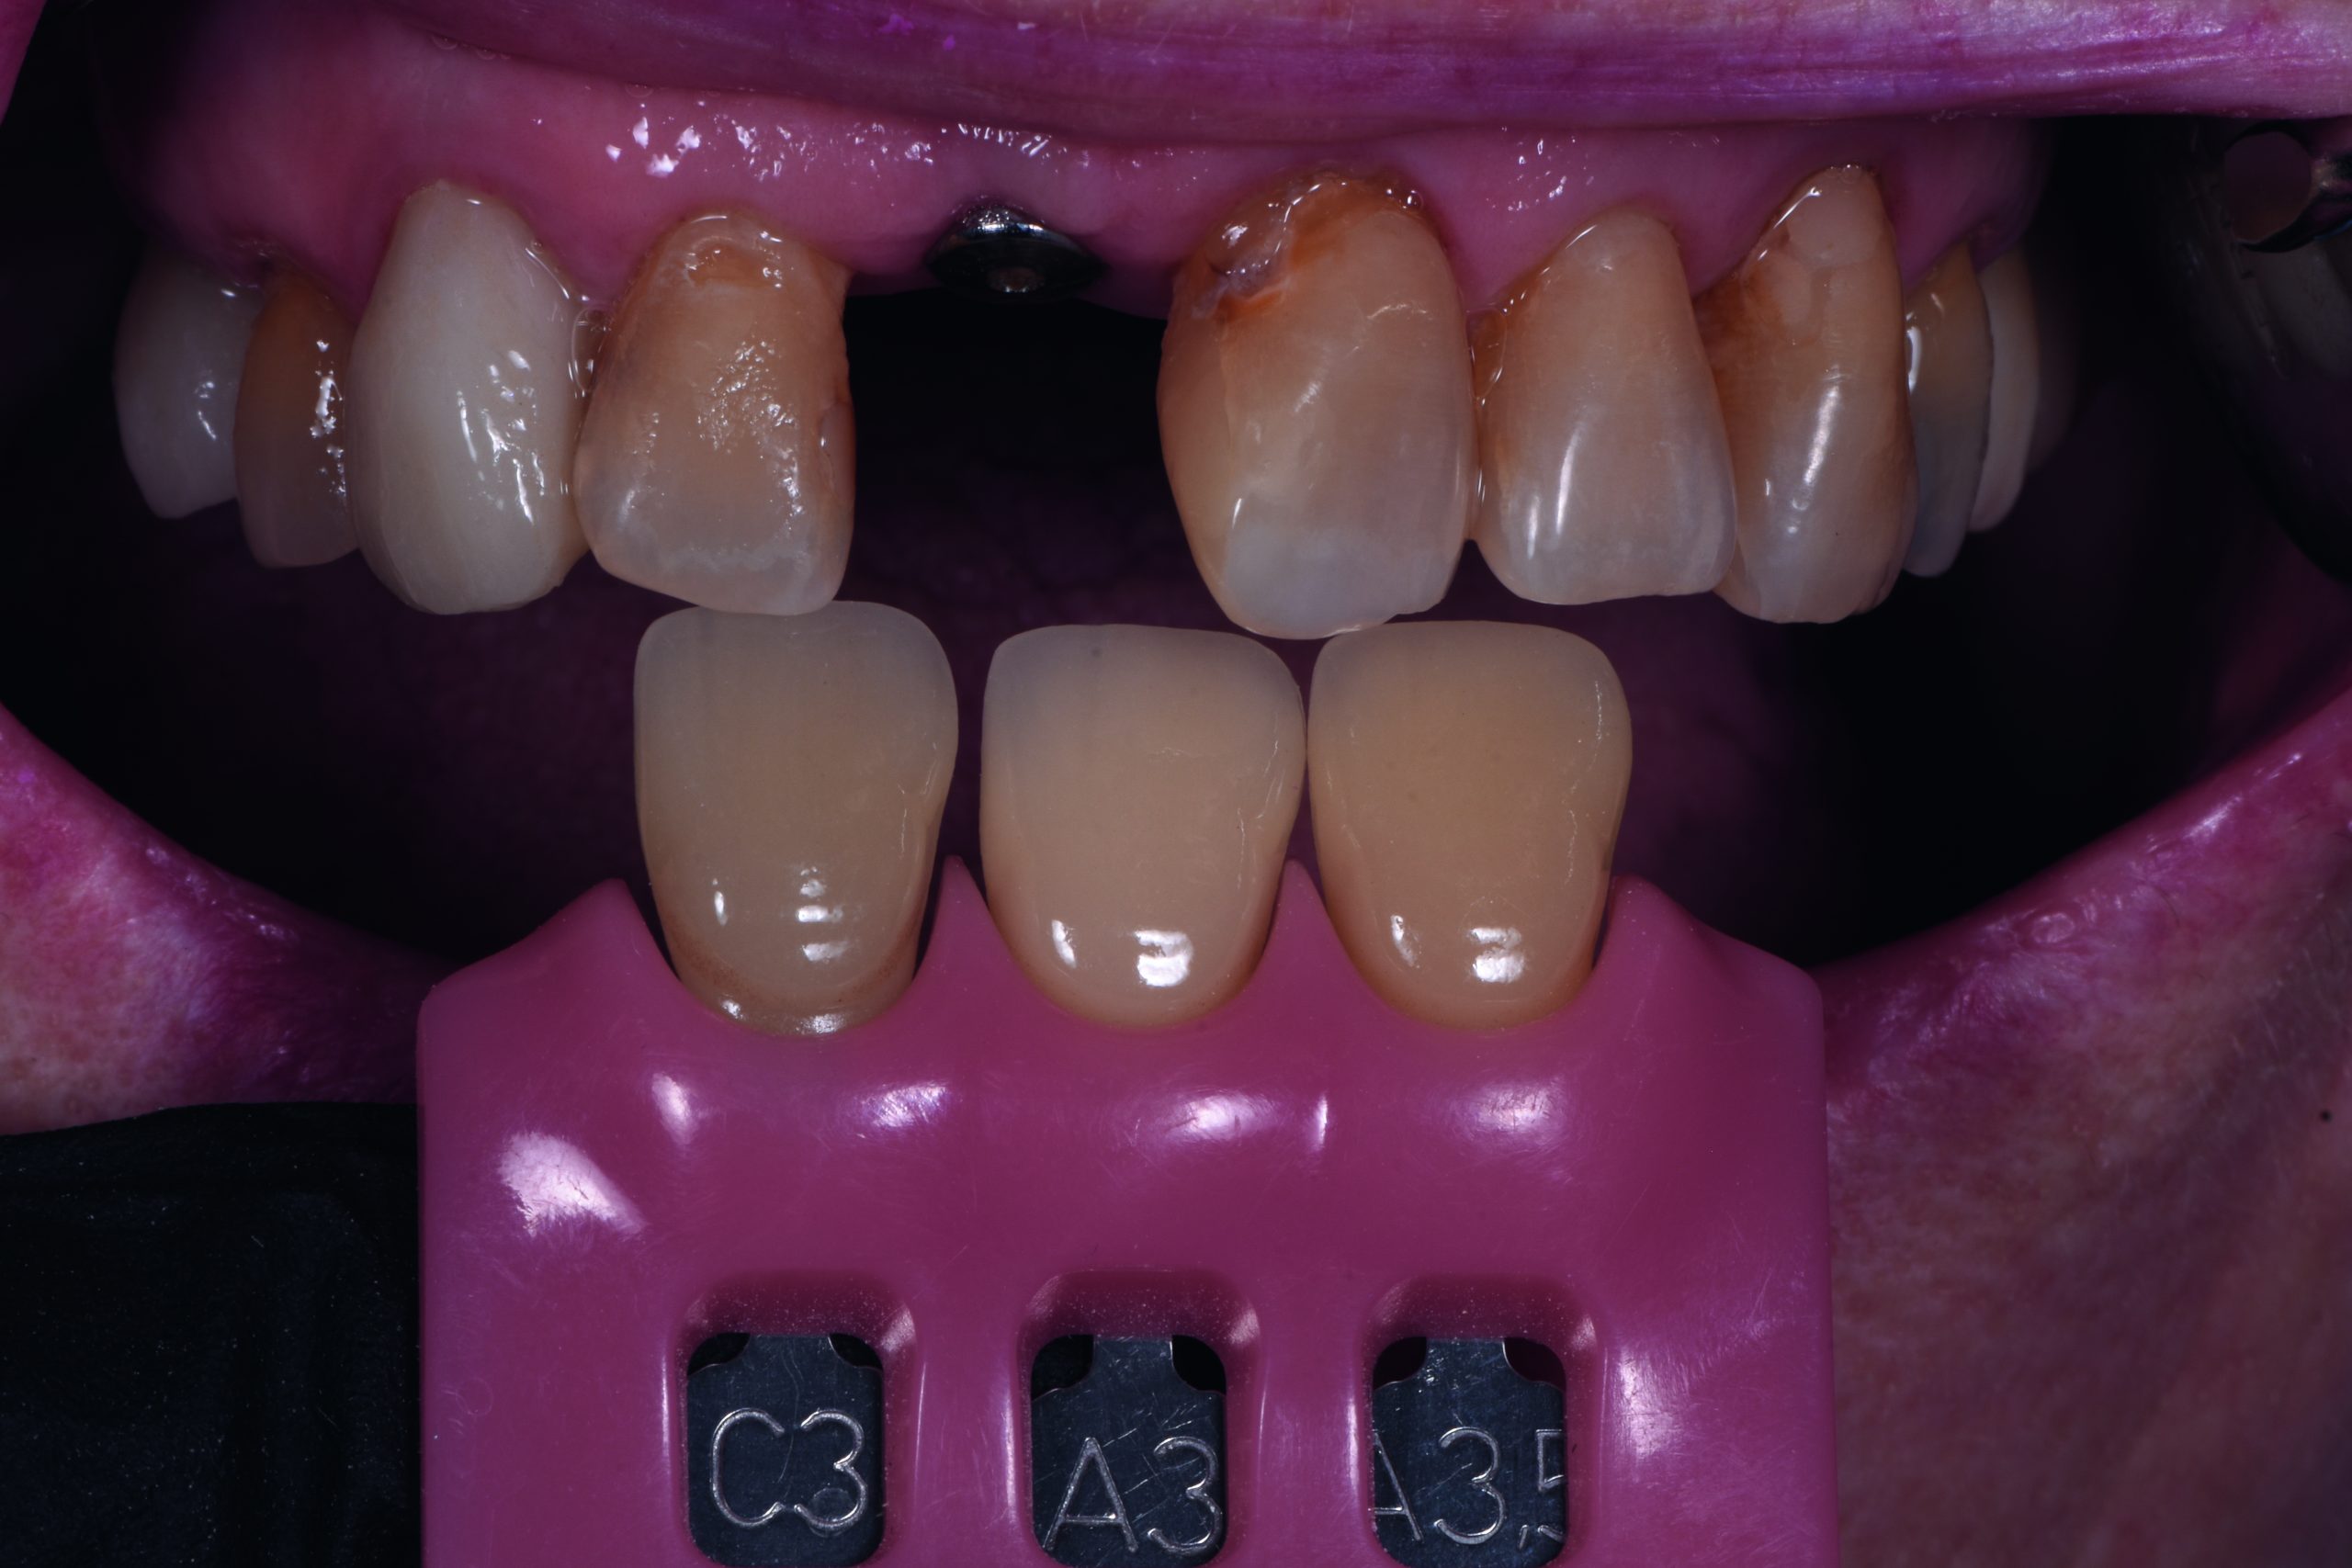
For these photos we did not use the Dragon Shade, but a sample holder from Shofu.
The Dragon Shade is applicable on all preferred shade scales (Vita classical, Vita 3D-Master or others) and consists of a sealing device for the samples a grey chart (grey value of 50 percent) and a gingival shield with an integrated strip of defined grey values.
The latter is used to calibrate the determination of the shade of the visible tooth in the photo in RAW format in an image processing program. This is so that the brightness, chroma, and hue of the entire image can be precisely determined.
The gingival shield simulates the influence of the gingiva in the determination of the shades mentioned above.
Shade determination
For shade determination, a photo is taken of the teeth to be analysed with the Dragon Shade positioned.
To eliminate reflections on the surface, a cross-polarisation filter is used.
Cross-polarisation ensures that the details inside the teeth emerge more clearly.
In principle, retractors should be used to keep the lips out of the image and to provide an unobstructed view of the teeth and colour samples to be analysed.
Shade samples are placed on the natural teeth, incisal edge versus incisal edge (see Figure 3a) to avoid unwanted shadow formation.
Furthermore, when taking the image, it is essential that the grey value strip is visible in the image, otherwise there will be no white balance in the software and therefore the photo cannot be calibrated.
If the photos have been taken as described, a quick analysis of the tooth shade in the software Keynote is conducted.
As previously mentioned above, the influence of the gums on the tooth shade is significant (see Figure 3b). This illustration clearly shows how different the same shade of tooth is with and without pink gingiva.
Using Keynote software and the shape of the natural tooth UL1 as a guide, the UR1 crown is cut and the shade scale samples and placed on a neutral grey Keynote sheet.
In the next step these shade swatches are duplicated and placed underneath.
These duplicates can be modified slightly, but only in brightness. The images of the modified teeth therefore have the same shade, but with a higher brightness value.
Shade analysis
On the basis of this sheet, a detailed shade analysis can now be performed (Figure 4).
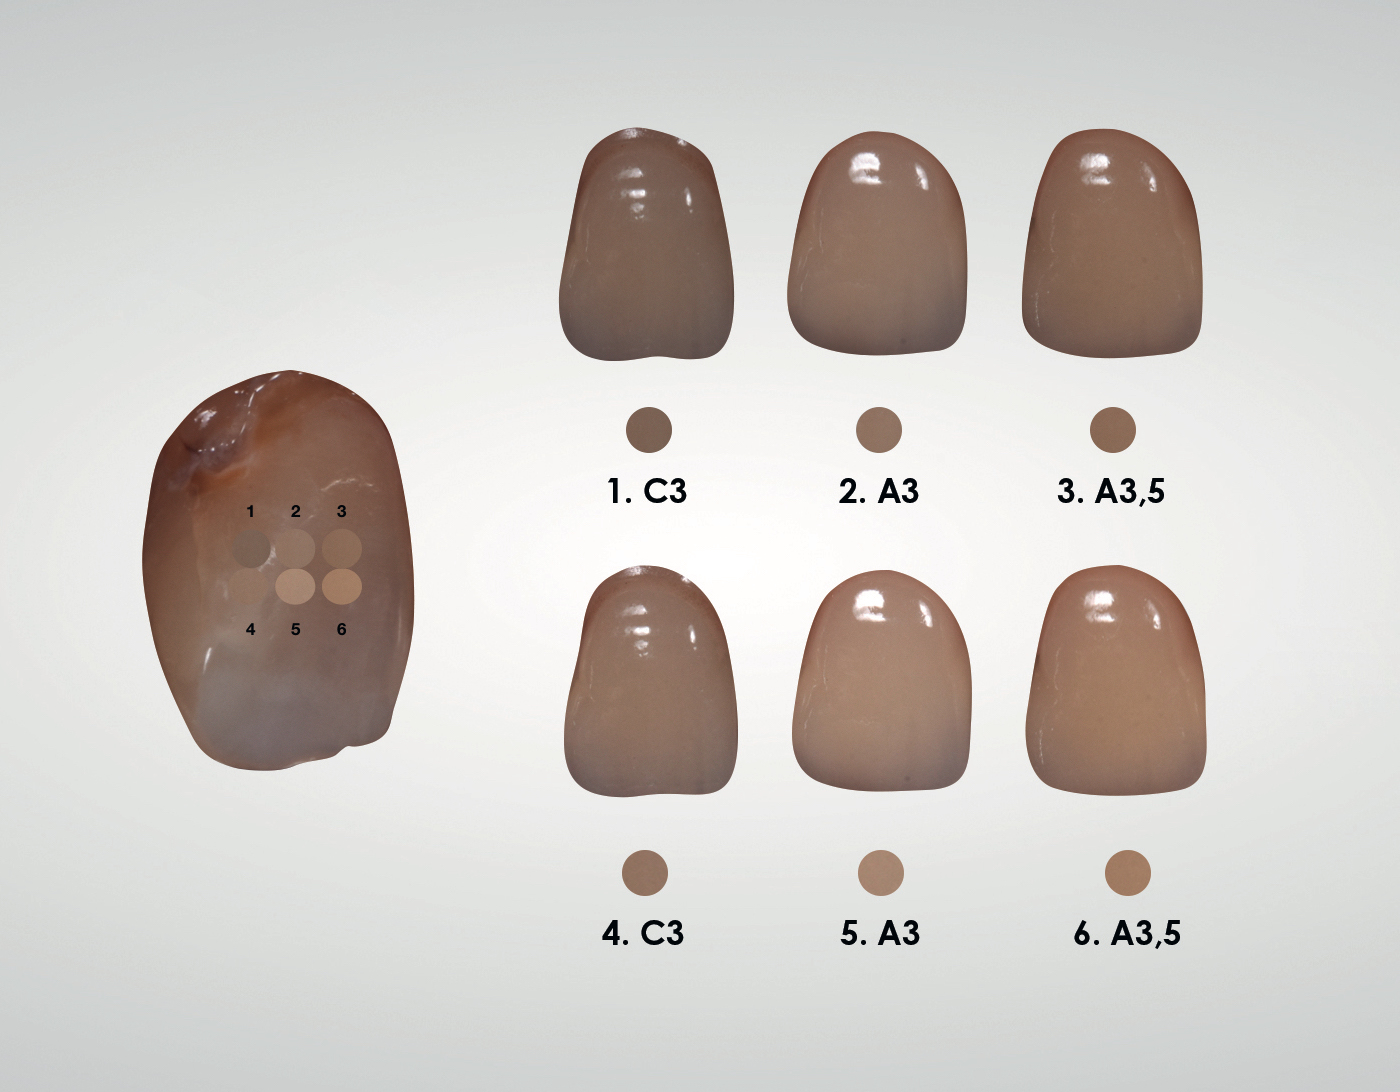
As already shown in Figure 3b, the pink of the gingiva spreads into the collar of the tooth.
For shade analysis, small sections of the teeth are placed over the patient’s dentition to evaluate the ideal shade (Figure 4).
As a result, it was found that the colour C3 (Vita Classical) with a slight increase in brightness value is the shade that comes closest to the natural tooth.
For us, this means that to accurately replicate the shade of this crown, a ‘bleached’ dentin is indicated.
The shade comes from the depth of a natural tooth and therefore influences the effect of all the other colour layers.
The essential layers for shade formation must be placed very deep and create an effect from the inside out. In our case we need a high value of brightness.
The ceramic coating we used was Vintage ZR. Also, OD C2 plus ODN were used or the layering of the dentin core.
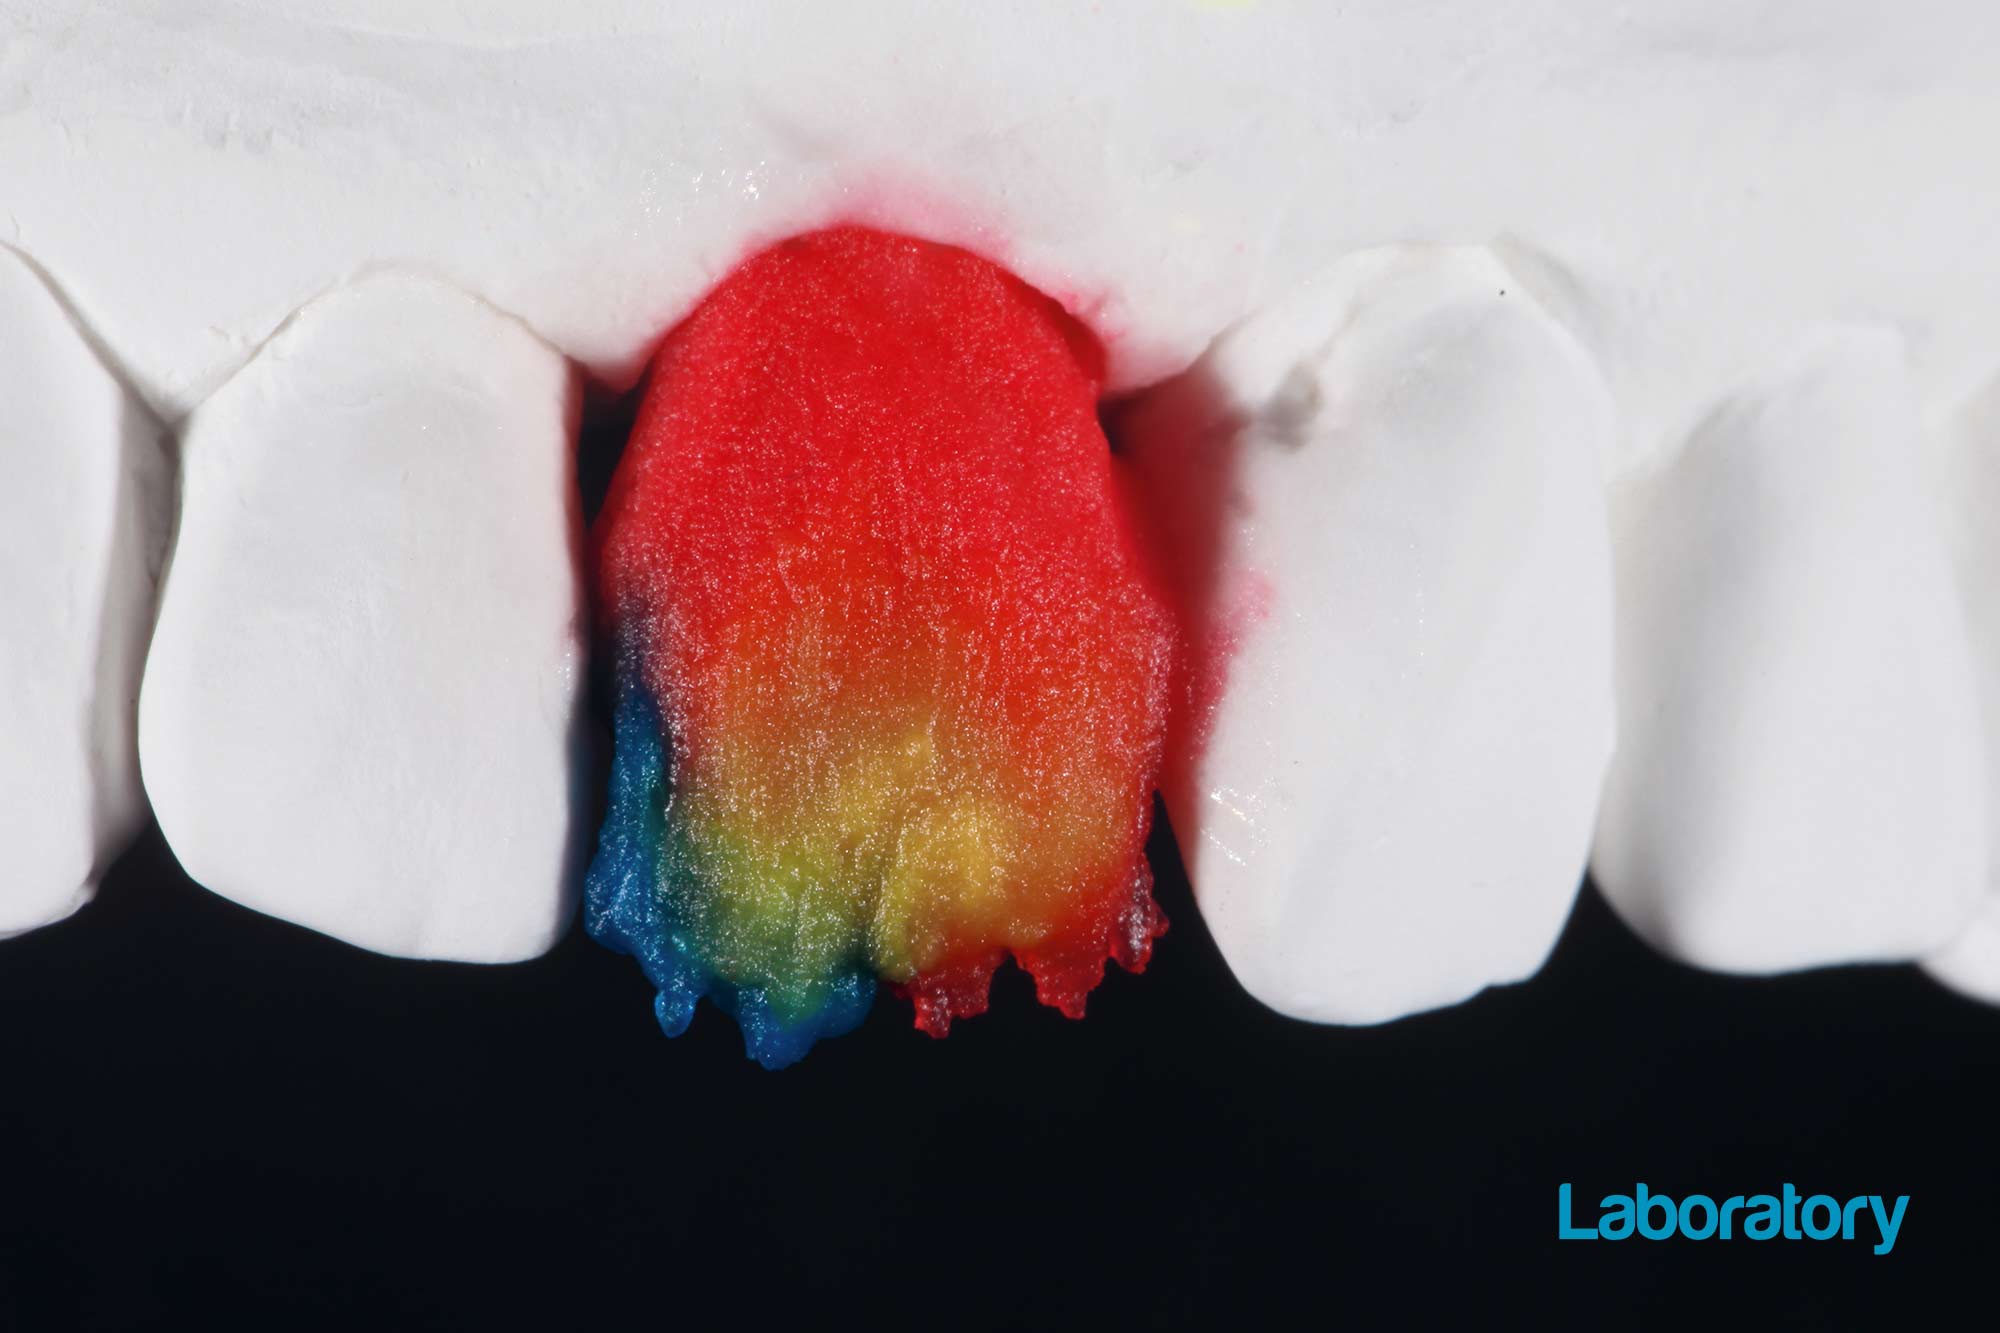
We used an anatomical tooth in reduced form. On the palatal side, it is reduced only half as small (Figure 5) and milled from a Katana HTll zirconium disk (Figure 6).
Beam preparation and layering in ceramic
The stratification process began with a slight individualisation of the zirconium oxide beams with Vintage Art colours.
Colour Stains (CS) were used to account for the influence of the gingiva, particularly Rose Pink in the cervical area (Figure 7).
On the modified beam a dentin core was created with a mixture of OD C2 and OD-N opaque dentine.
The incisal area was covered with a similar mixture and the addition of the effect, Gray Transparent (GT) enamel. The purpose of this layering and firing increases the brightness value in the cervical area and reduces brightness value in the incisal third (Figure 8).
The entire layering requires several firings to provide an opportunity for shade correction as indicated.
The anatomically reduced crown design allowed for a small amount of ceramic to be layered in the palatal area. In addition, from a hygienic point of view, a monolithic palatal zone is preferred.
On polished zirconia, plaque generally does not adhere, thereby minimising the risk of peri-implantitis.
Dentin layering
The next step was the layering of the dentin.
According to the shade analysis, about three quarters of the tooth presented a uniform base colour.
In the area of the incisal edge, the tooth appeared to be slightly more transparent and greyish purple. Also, the enamel layer is thicker in the upper third, which is why the tooth has a slightly more milky-white appearance.
A thin layer of a mixture of Grey Transparent, Pink Transparent and T Glass was used. This created the effect of depth and opacity in the upper third, between the enamel and dentin.
This mixture in a ratio of one to one to two will act as a light-absorbing buffer (Figure 9).

Finally, the crown is completely covered with a layer of White Enamel and T Glass in a one to one ratio (Figure 10).
All these masses are applied together and then fired. After firing, a correction firing follows to compensate for the vertical and horizontal contraction.
Figure 11 shows the result as seen from the incisal edge.
The final step is a polishing firing followed by a manual polishing. This is the only way to achieve a beautiful, natural-looking surface (Figure 12). In addition, the degree of gloss is adjusted individually to match that of the neighbouring teeth (Figure 13).
The shades used can be mixed with glaze in a ratio of one to one. This will ensure that the characteristics of the shades applied to the surface are not lost during polishing.
 Figure 10: Finally the layering was completely covered with a mixture of White Enamel and T Glass in a ratio of one to one


Conclusion
The dental technician knows how to achieve an accurate, lifelike match by mixing ceramic shades and characteristics that blends naturally into the arch of the natural teeth.
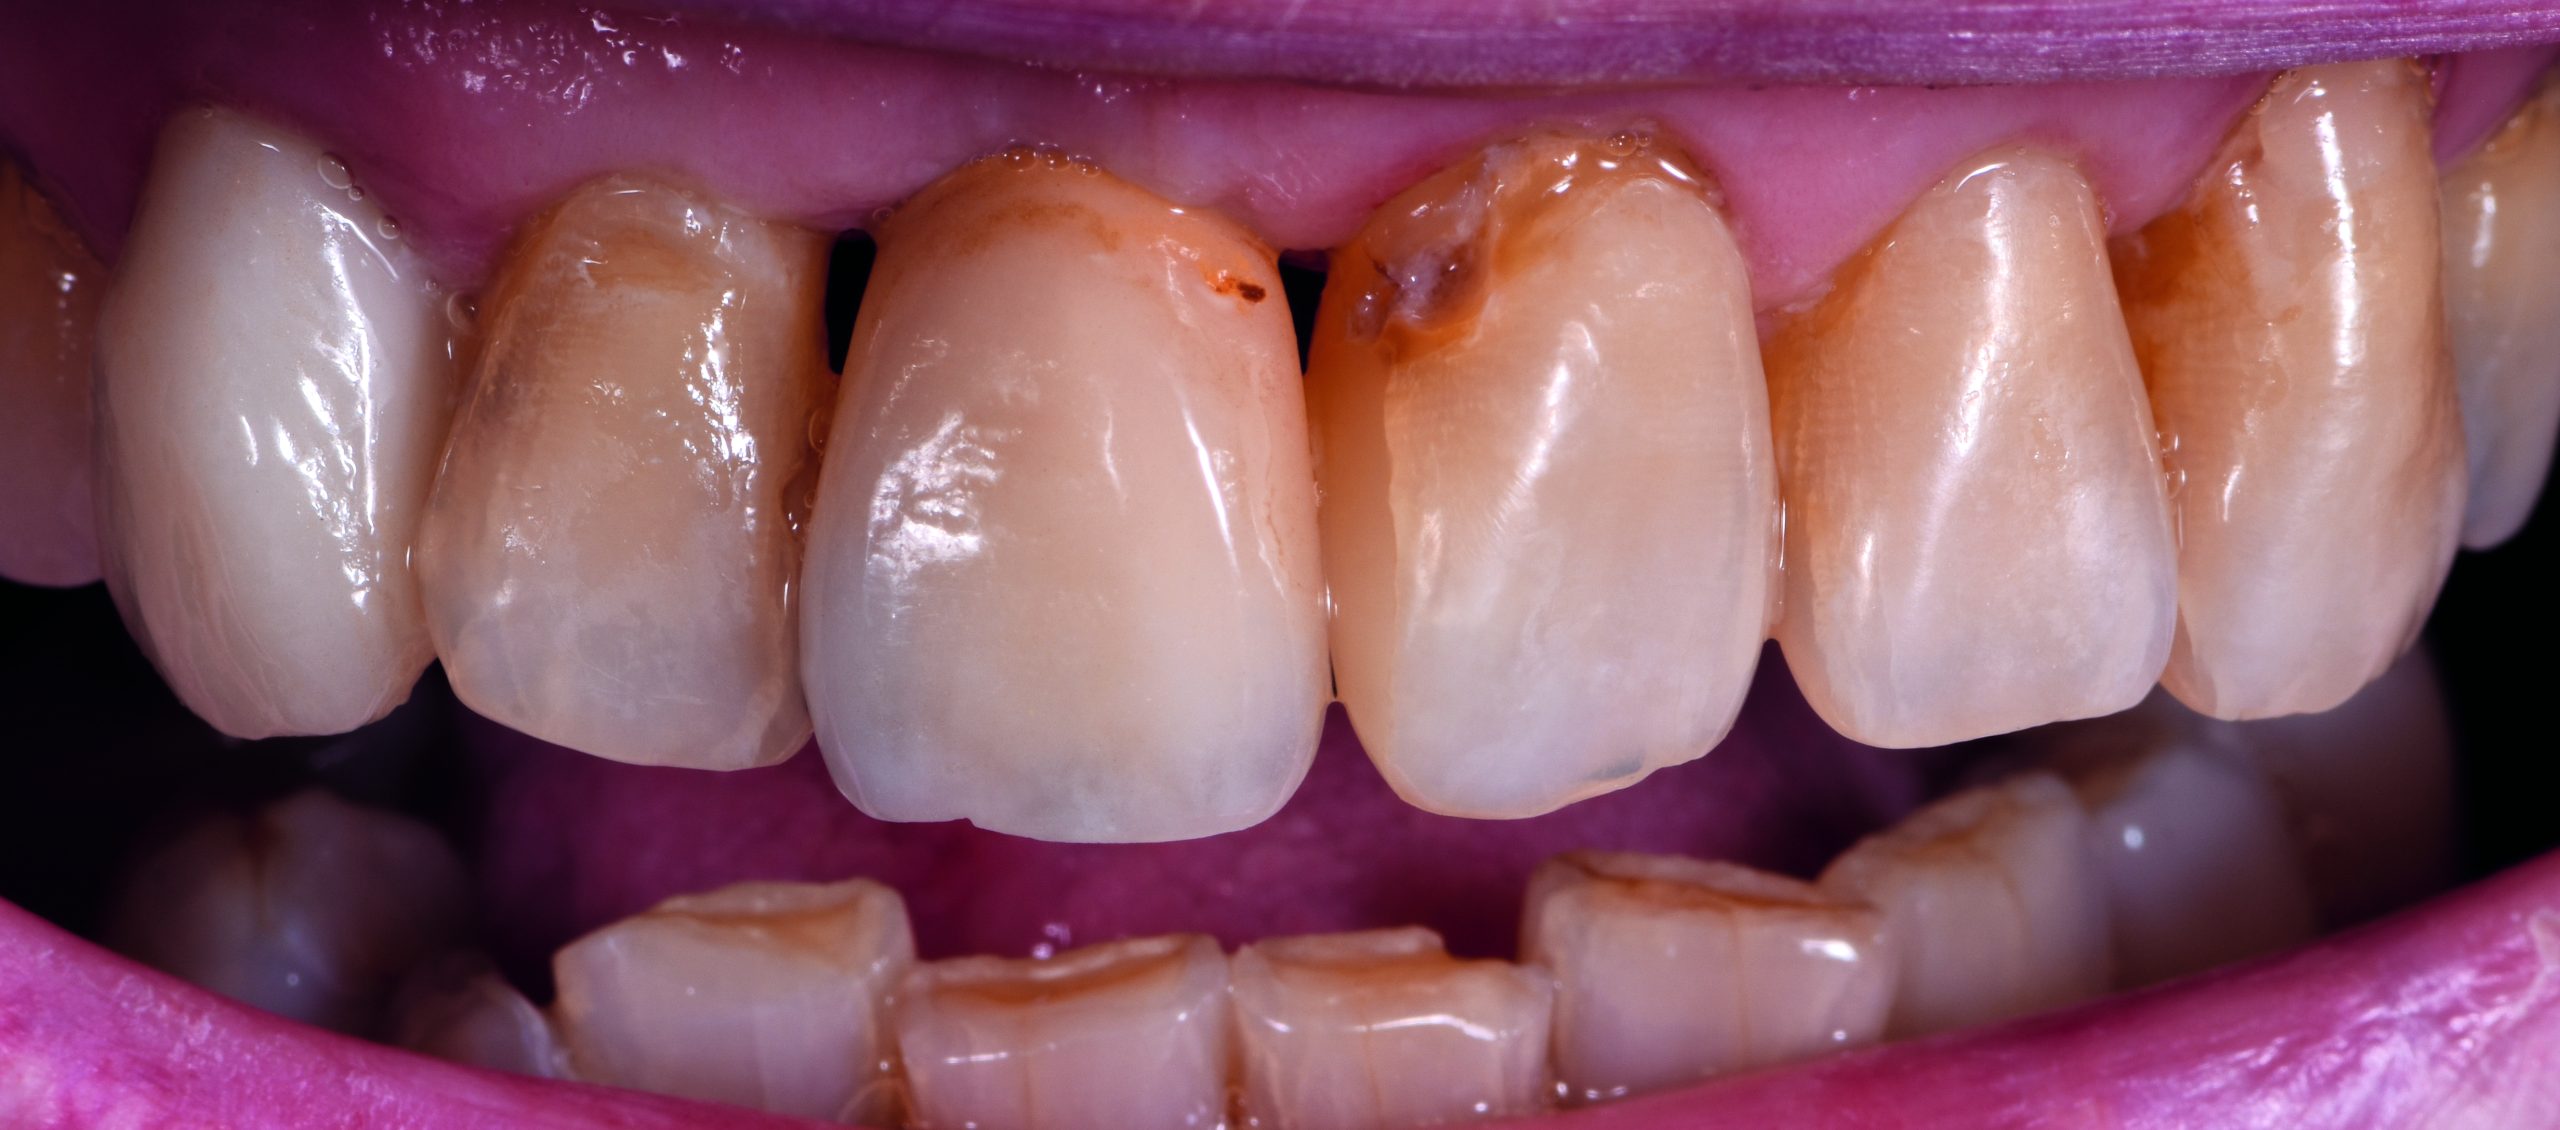
Figure 14 is the final image of the patient with the crown inserted and supported by implant in region 11.
The crown fits harmoniously with the teeth and looks natural.
Zirconium oxide is a good material for the framework and does not adversely affect the colour of the crown. It also provides a good balance of transparency and opacity. In addition, it delivers a natural appearance and maximum stability to the all-ceramic prosthesis.
It is worth investing time in the preparatory measures described in this article. These include the correct and accurate choice of shades and the preparation and analysis of a colour sample sheet.
The correct design of the crown and abutment are important to obtain natural-looking aesthetics and long-term stability (Figure 15).
All these are investments toward a satisfied patient and long term, quality restorative results.
Follow Dentistry.co.uk on Instagram to keep up with all the latest dental news and trends.
Top laboratory stories
- Lab in the Limelight – CW Dentures
- Auxiliary digital parts – 3D printing and its possibilities
- The Godfather of FX teeth – creating teeth for Star Wars, Marvel and Austin Powers
- Beyond the Dental Lab – Jonathan Tasker
- Finding my feet as a dental technician.
Follow Dentistry.co.uk on Instagram to keep up with all the latest dental news and trends.

