David Waring explains how Maintain can help save you and your patients time.
Frustrated with the chairside retainer wire-bending process? What would you rather be doing? With the Maintain Retainer, you can do something else. Consultant orthodontist, David Waring, and DB Orthodontics designed the Maintain Retainer to offer an easy-fitting protocol. It eliminates wire bending in-practice, with a reassuring belt and braces approach for patients.
‘Dual retention is a desired approach for retention following active orthodontic treatment’, said David Waring. ‘The design of Maintain performs both roles and allows easy placement of the bonded retainer.’
The Maintain Retainer has two elements: a pre-shaped, ready-to-fit lingual retainer made with rectangular shaped Straight 8 Plus, and a removable pressure-formed retainer for the full arch, with a spare for the patient to wear nightly. A major advantage of using Maintain is that impressions are taken before debond and the retainer is ready to fit directly at the debond appointment. This means:
- Only one appointment therefore required
- Less chairside time
- Less visits for patients
- Reduce time for any adverse tooth movement to occur.
Five steps to fitting Maintain
Step one: place transfer jig
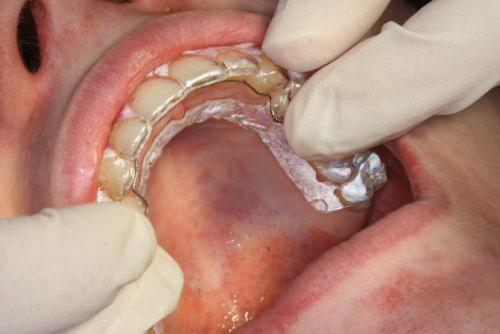
Place the jig in the mouth, which won’t slip. Vacuum formed to the patient’s dentition the jig will therefore click into place. Check the retainer for fit, ensuring the fixed part of the retainer is in a passive position on the lingual surface of the anterior teeth.
Step two: bond

Bonding is easy with the Maintain you can enjoy the freedom of having both hands free with a secure transfer jig. Straight 8 Plus’ flattened rectangular shaped retainer wire provides maximum surface contact with the lingual surface in comparison to rounded brands, which have a minimal sized contact point.
Step three: cure
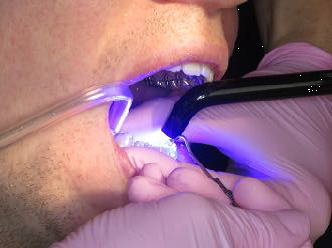
The wire is embedded in the sides of the window of the transfer jig and will stay secure during the bonding and curing stage. The low profile of Straight 8 Plus wires ensures maximum patient comfort and minimises occlusal interferences.
Step four: remove wire from jig
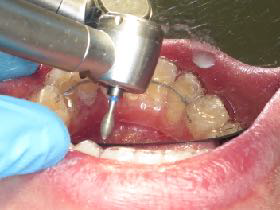
Once the flexible wire has been cured into place, the jig is removed. The two ends of the bonded retainer are separated from the retainer. This is done by a high speed bur to detach the wire from the retainer at either end or by cutting the wire with ligature cutters. The fixed retainer remains bonded on the teeth placed in the correct position.
Step five: remove transfer jig
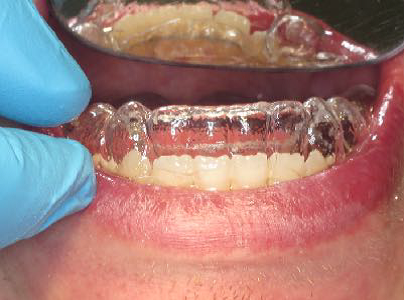
Once separation is achieved, the removable retainer is simply removed from the teeth. The two ends of the Straight 8 Plus wire are tidied up as necessary and the retainer replaced in the mouth. This serves as the dual retainer normally worn during evening and nights.
Maintain also comes with an additional retainer for peace of mind. This means the patient not only has the option of using the transfer jig, but also a full arch retainer as a spare.
GDP Andy MacCallum said: ‘Maintain has solved all my fixed retainer problems. I am really happy with this product, it’s excellent’.
Get in touch
Maintain makes fitting appointments simple while offering maximum strength and support for the patient’s dentition. DB Orthodontics’ Lab, Studio 8, accepts silicone, alginate or digital impressions and offers a five-day turnaround.
Send your impression with the lab form to the team, and if you have any queries, the team are always available on the phone for support. To learn more call 01535 656 999, or email [email protected].

