Balraj Sohal explains how he repaired a 54-year-old patient’s upper left first molar.
A 54-year-old patient broke a portion of her upper left first molar whilst having a meal. She attended an out of hours dentist who temporised the broken tooth with a filling. She had no symptoms or discomfort from the tooth although as it had broken, she wanted to ensure it was protected.
Examination
The upper left first molar had a GIC restoration filling the mesio-palatal region of the tooth. The tooth was not tender to palpation, non-mobile and upon radiographic assessment there were no signs of periapical pathology.
Treatment plan
Due to the size of the pre-existing amalgam and the fact there was a fracture on the distal marginal ridge we decided to restore this tooth with cuspal coverage to help minimise further fracture.
Treatment
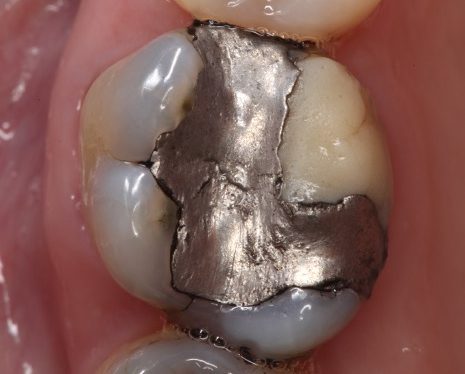
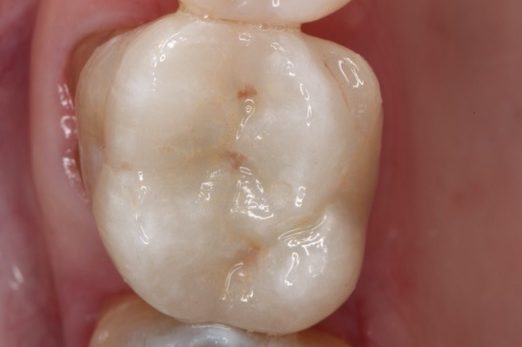
Figure 1: Pre-operative view of the upper left first molar – note the large failing amalgam, the GIC restoration, which has been placed to ‘patch up’ the broken mesiopalatal cusp and the fracture line on the distal marginal ridgeFigure 2: Prior to removal of the restoration, a rubber dam was used to isolate the upper left first molar. A floss ligature was used to reinforce the rubber dam apically around the first molar. I prefer to prepare onlays under rubber dam where possible – I find the rubber dam helps with retracting the soft tissues and providing comfort for the patient – both of which make the preparation appointment easier and more efficientFigure 3: Wooden wedges were placed interproximally to apply an interproximal force, slightly separating the teeth. The wedges can help protect the neighbouring teeth during preparation. I routinely pre-wedge or place inter-guards before drilling to protect the neighbouring teeth during the preparation. The failing restorations were removed and there was caries noted beneath the restorations
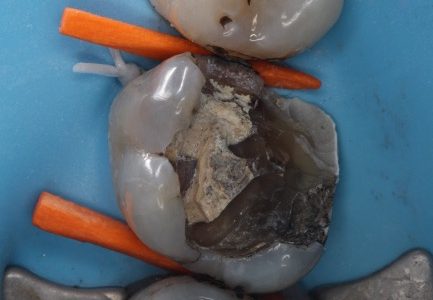
The caries was removed with a rose-head bur until a caries free enamel-dentine junction was achieved. Note the fracture line running through the distal marginal ridge – manual pressure was applied with an excavator and unsurprisingly the disto-palatal cusp fractured off completely as it was undermined – only the buccal wall was left remaining.
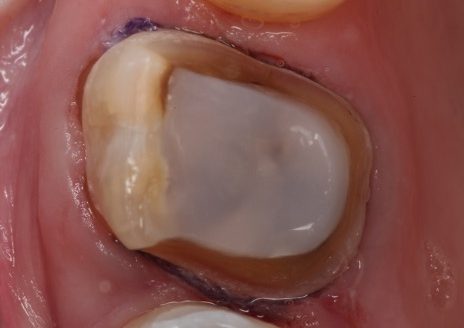
Figure 4: An occlusal reduction of 1.5mm was completed and the margins of the preparation were bevelled using soflex discs and white stones to ensure there were no sharp corners. Immediate dentine sealing (IDS) was completed to seal the dentinal tubules in order to reduce the chances of post-operative sensitivity. A highly charged flowable composite was used for IDS
A size 0 retraction cord was placed into the gingival sulcus to enable an accurate impression to be obtained.
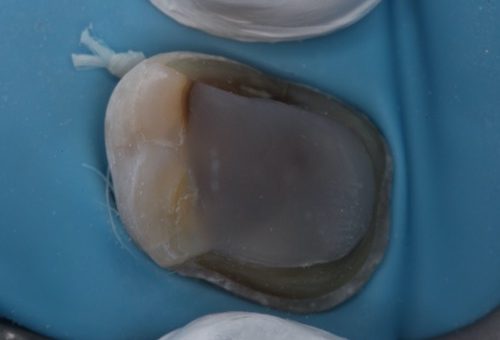
Figure 5: A beautiful monolithic lithium disilicate (pressed) overlay was fabricated by Simplee Dental Ceramics
The overlay was tried in on the preparation in order to assess the marginal fit and the occlusion. Once the fit and occlusion was approved, the fit surface of the overlay was air-abraded with 27-micron alumna oxide particles. The fit surface was then etched with hydrofluoric acid etch for 20 seconds (gently rubbing with a microbrush) – washed thoroughly and then dried. A drop of fresh silane (Monobond Plus, Ivoclar Vivadent) was applied to the etched fit surface and left for 60 seconds. After 60 seconds the silanated fit surface of the overlay was air-dried to remove the residual solvent. Next, Optibond FL bonding agent was applied to the silanised surface.
Figure 6: Now the overlay is ready to be bonded into place, the tooth must be adequately prepared to ensure optimum bonding. A rubber dam and floss ligature were placed over the prepared upper left first molar to ensure the margins were easily accessible. The adjacent teeth were isolated with Teflon tape to prevent the cement from sticking to the adjacent teeth
The tooth surface was air-abraded with 27-micron alumna oxide particles. And then it was etched for 30 seconds with 37% orthophosphoric acid – washed and dried. Optibond FL bond was then applied onto the tooth surface. Nexus (white) dual cure resin cement was used to bond the overlay in place.
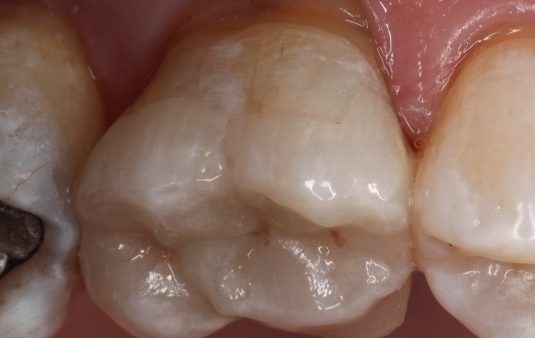
Figure 7: Immediate post-operative view of the overlay bonded in place. The excess cement has been cleared away and the contacts flossed. The final cure of the overlay was done through a layer of glycerin gel to remove the oxygen inhibited layer. The margins of the overlay were polished with brownies and fine soflex discsFigure 8: An immediate post-operative oblique view of the overlay bonded in place. The technician has matched the overlay very well to the adjacent teeth as well as the underlying tooth structure. The margin will blend harmoniously once the tooth rehydrates. This image is immediately after the rubber dam has been removed so the teeth are still dehydrated
Follow Dentistry.co.uk on Instagram to keep up with all the latest dental news and trends.